New to Hive OS and not sure where to start? This easy to follow step-by-step guide will take you from zero to mining in no time. Let us help you set up Hive OS.
December 13th 2021| Mike Humphrey
Table of Contents
What is Hive OS
If you haven’t heard of Hive OS, it’s a linux based operating system with one purpose, crypto mining. If you have a dedicated crypto mining machine, then Hive OS is the way to go. It automatically updates GPU drivers and mining software, and can be controlled remotely. It’s scalable, which means it works on a single rig or a large farm. You can grow your operation from one mining rig to a whole farm with one piece of software. Read our Comparison of Hive OS vs Windows.
How To Set Up Hive OS
The following is a step by step guide on how to install and set up Hive OS for the first time. Before starting you will need to connect an SSD or USB to your computer. The SSD/USB will be used for the Hive OS disk image. We will be using Windows to install the operating system. Your SSD should be a minimum of 8GB, but we recommend 12GB or more. A USB is also an option, but they are slower, and you may run into memory errors. An SSD is your best bet.
-
Sign-Up For Hive OS
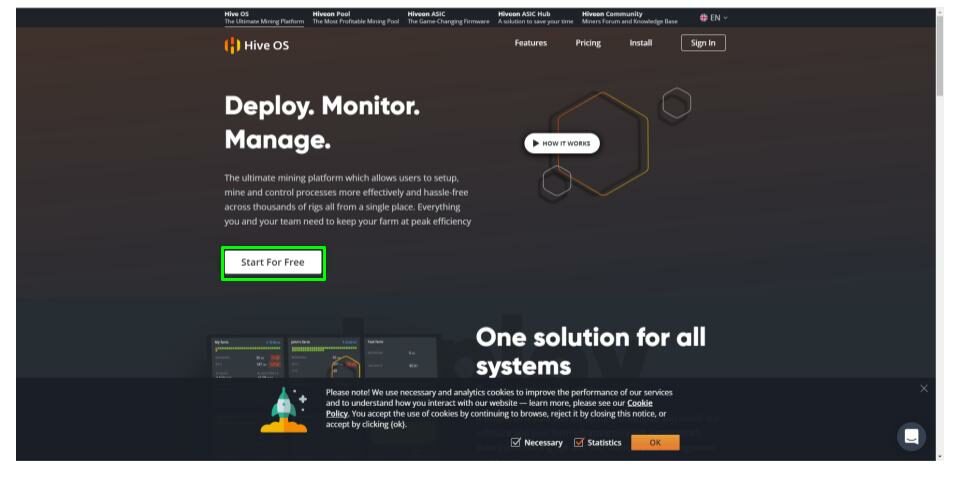
Go to the Hive OS website, and click on Start For Free.

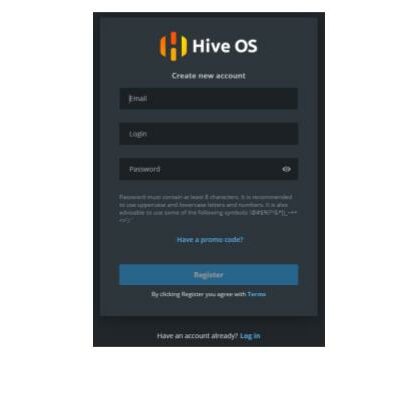
You will be taken to a new page. Enter your email address, and create a login and password. Click Register and follow the instructions. We recommend setting up 2 factor authentication for security purposes.
-
Download Hive OS
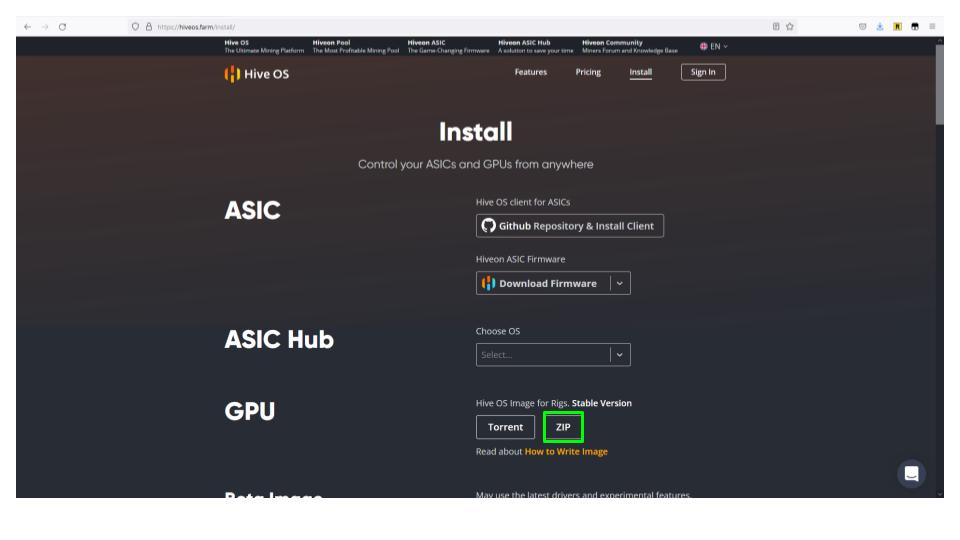
To download Hive OS, go to the Hive OS install page, beside GPU click on zip.

-
Install Hive OS on SSD/USB
-
Initialize SSD in Windows (SSD ONLY)
If using a USB, you can skip directly to step B. Before you can install the disk image on your SSD drive, you need to initialize it in Windows Disk Manager. This will allow Windows to see the drive. If you don’t have the drive connected yet you will need to shut the computer off, and connect the SATA power and data cables to the SSD.
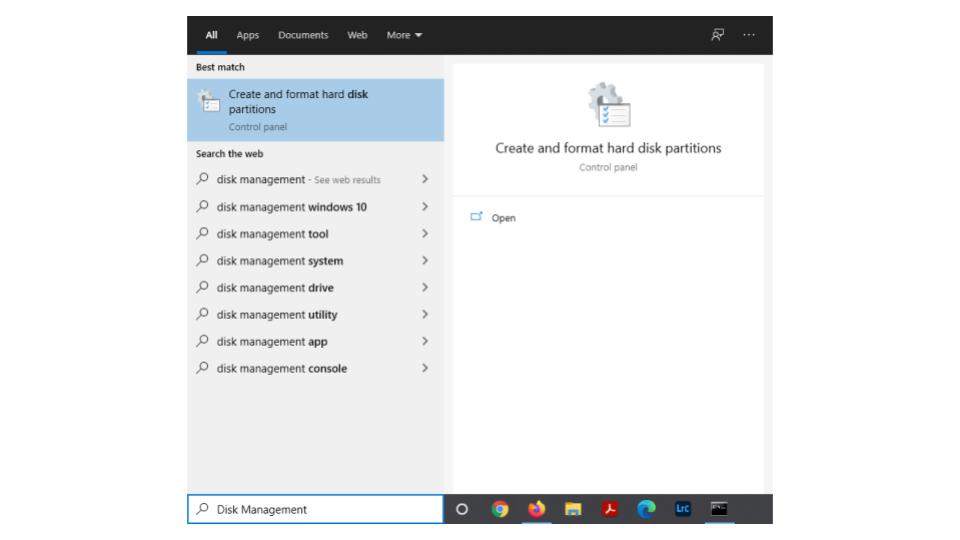
Type disk management in the Windows task bar and open the application.

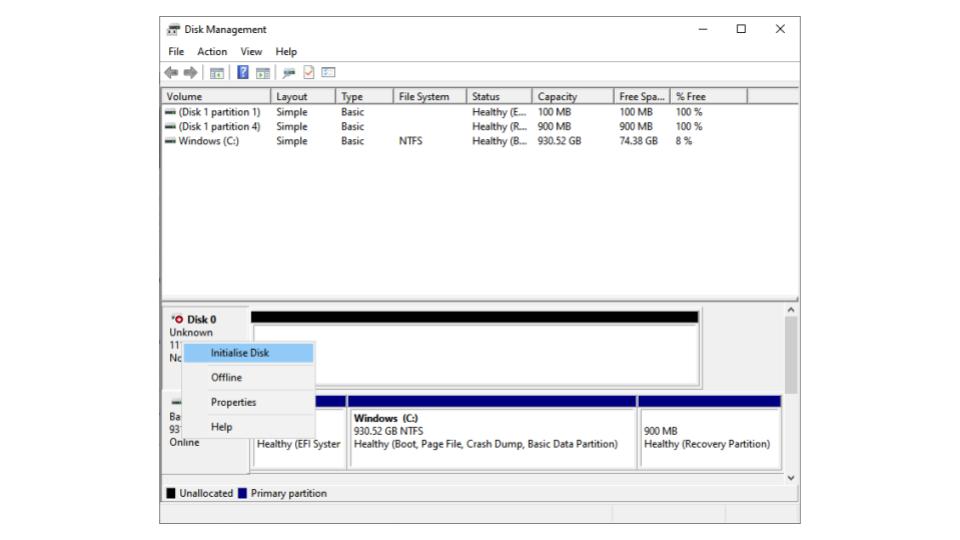
Windows Disk Manager may take some time to load. Once loaded you should see an unknown disk. To initialize the new volume, right click beside the disk name and select initialize disk. You will be asked to select a partition type, choose GPT and click OK.

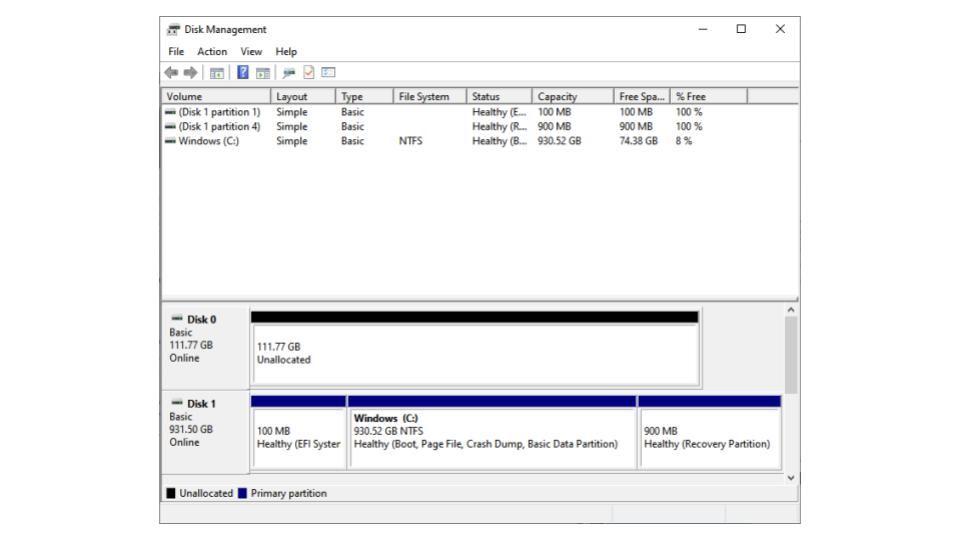
The status will change to online and it will be unallocated, as seen in the picture below.

Windows will now recognize the new SSD and it is now ready for the Hive OS install.
-
Install Hive OS on SSD/USB (USB USERS START HERE)
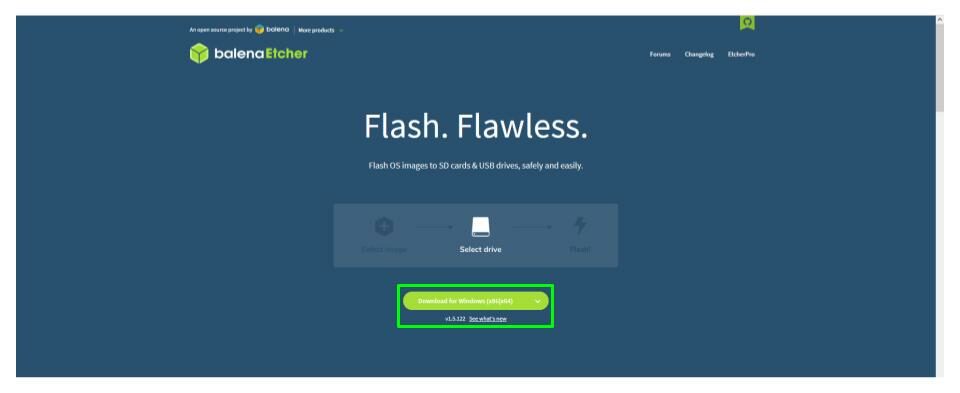
Now that the drive is a recognizable volume in Windows we can flash the drive with the Hive OS disk image. To do this we first need to download software that will allow us to install the image. We use Balena Etcher. Go to their site, download, and install the software.

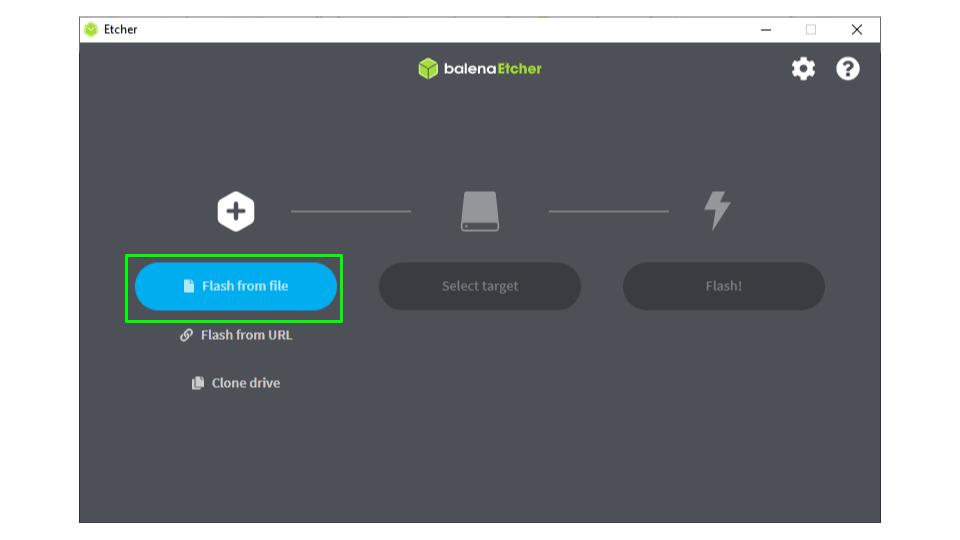
The program is relatively easy to use. First we select the disk image to install on the drive. To do this, select Flash from file .

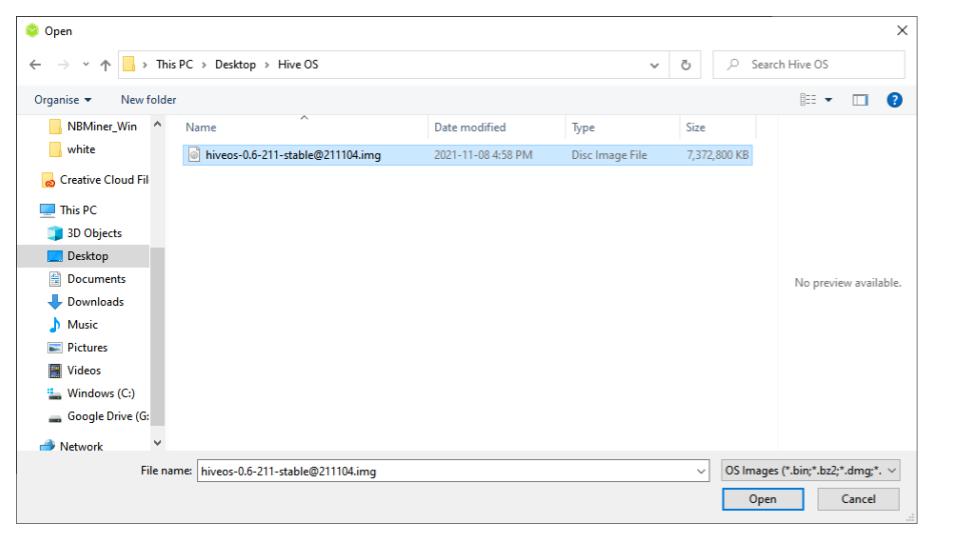
Choose the Hive OS image we downloaded in step 2. There is no need to extract the file, the program will do that for us.

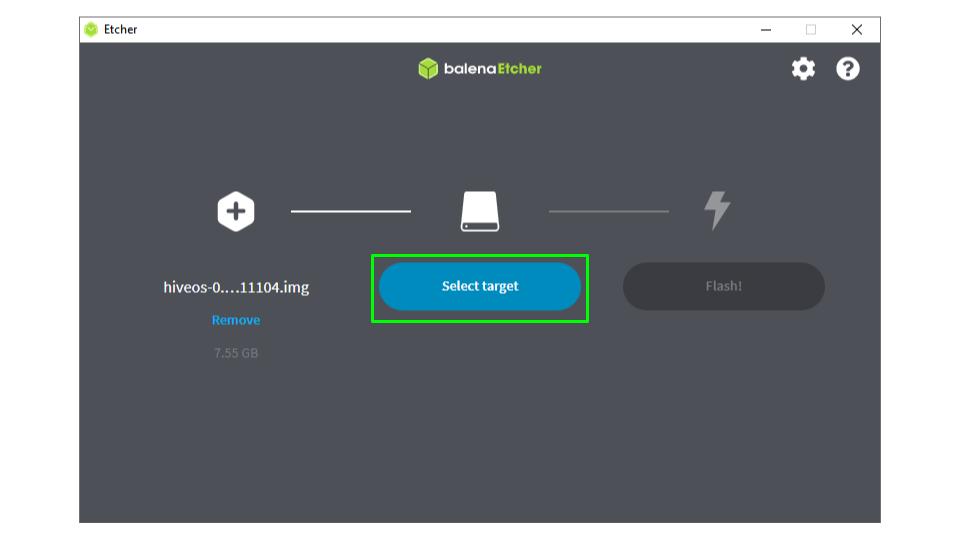
The next step is to select where we want the disk image to be installed. Click Select target.

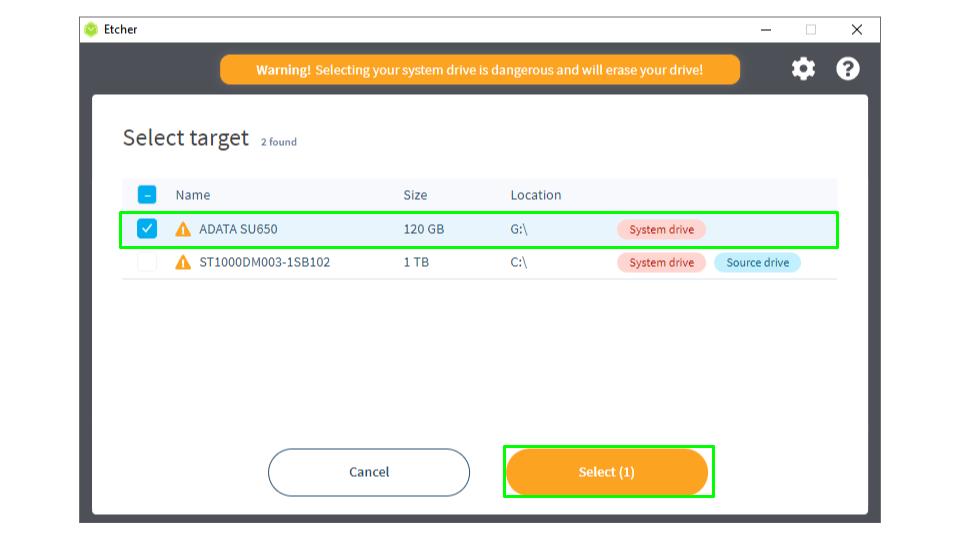
Choose the SSD or USB you want to install Hive OS on. Make sure you are selecting the correct drive. When the drive is flashed it will erase everything that was previously installed on the drive. DO NOT SELECT the source drive (this is where Windows is installed).

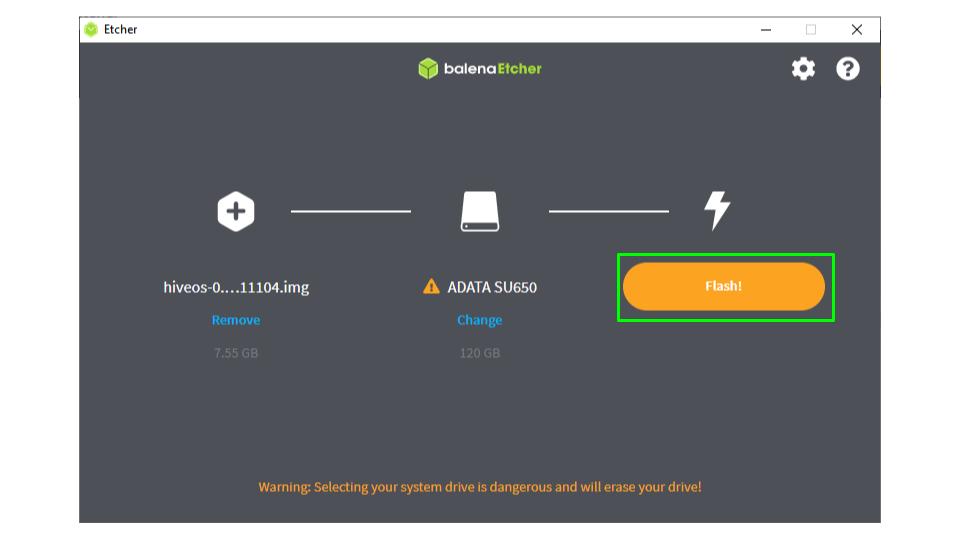
Now that the image and destination are selected, click Flash.

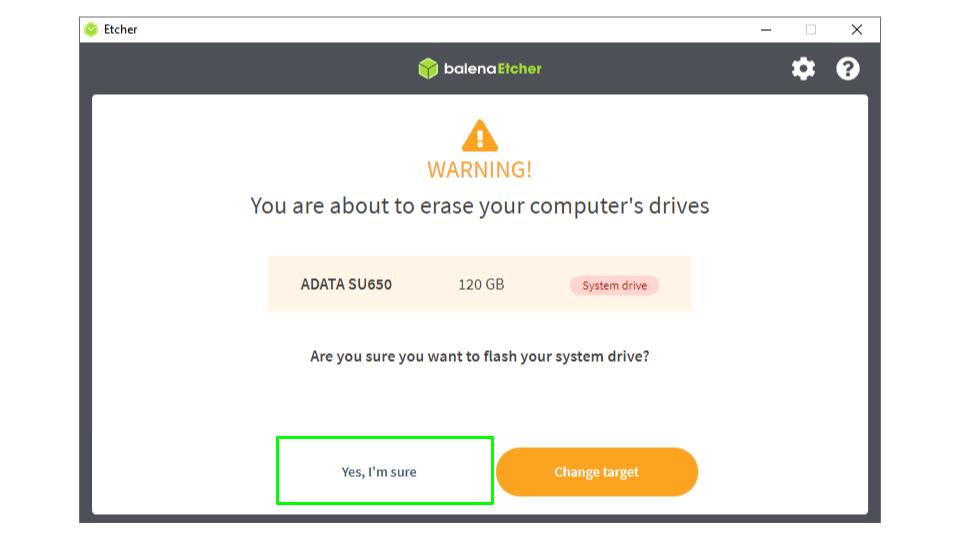
A warning will pop up letting you know that you are about to erase the selected drive. This is not a problem as long as you selected the correct drive. Once you have confirmed your choices, click Yes, I’m sure.

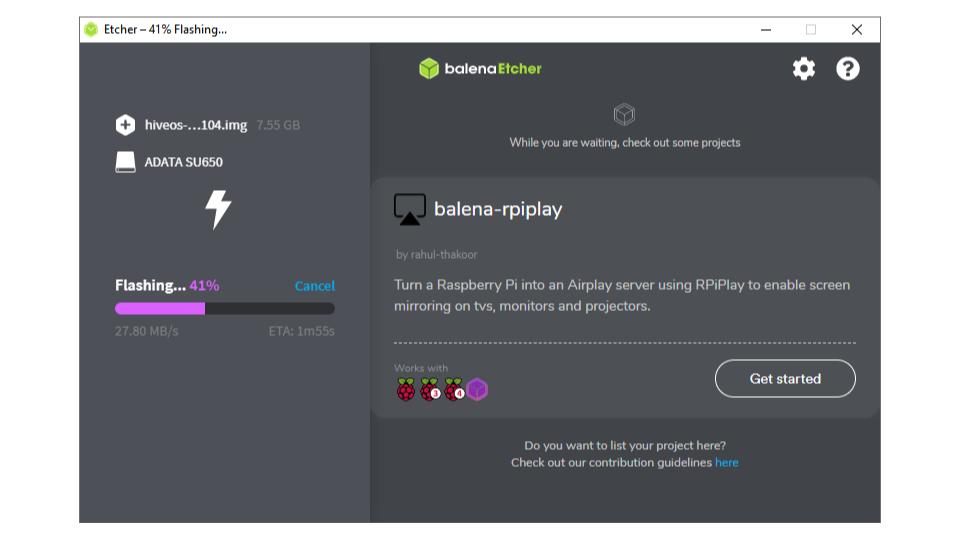
Balena Etcher will now begin flashing the drive.

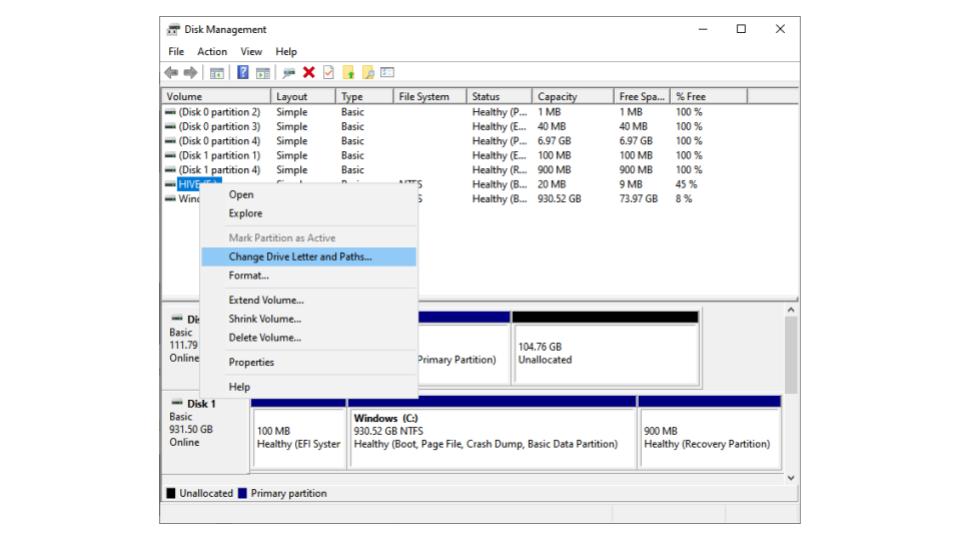
Hive OS is now installed on the USB/SSD. If Windows does not recognize the new drive, you may need to manually assign it a drive path. You can do this by open Windows Disk Manager again, finding the Hive OS drive, right clicking on it and assigning it a drive letter.

-
Set Up Hive OS Config File
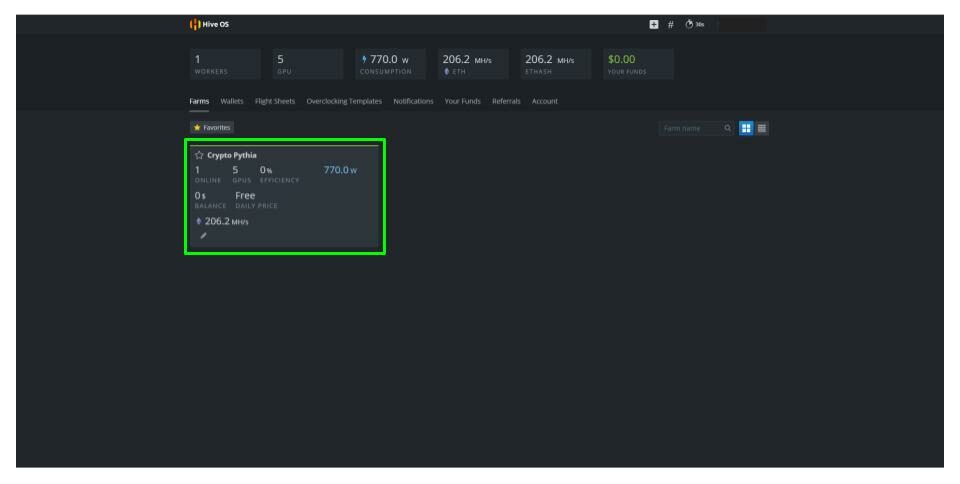
Before installing the USB/SSD into your new system, the Hive OS config file must be set up. The config file tells Hive OS which account the new rig belongs to and the name of the rig. Before editing the config file, you will need to copy your farm hash from the hive dashboard. Go to https://the.hiveos.farm/ and log into your account and select your farm.

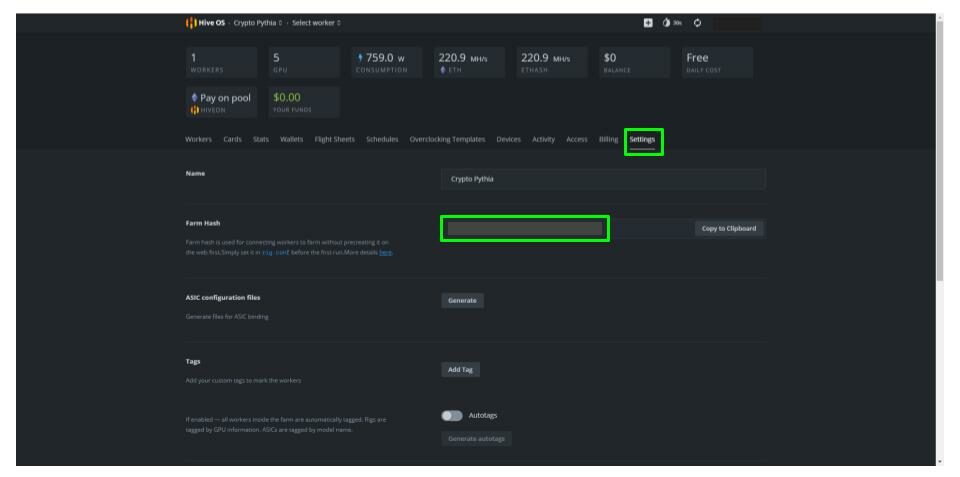
Select the settings tab and copy the farm hash to the clipboard. You can put this in a text file until you need.

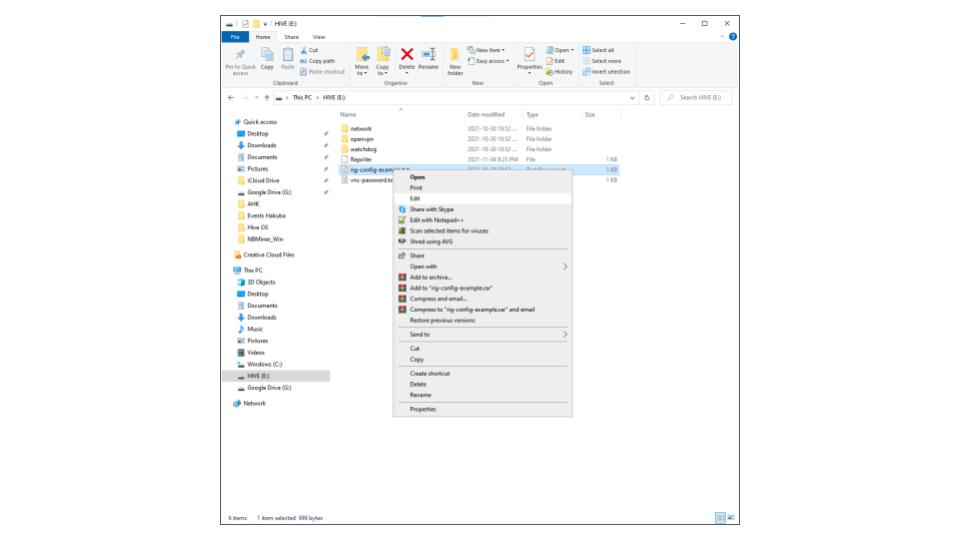
In Windows File Explorer, open the Hive disk image. This should be the drive path you assigned in step 2B. Find the rig-config-example.txt file and open it in a text editor.

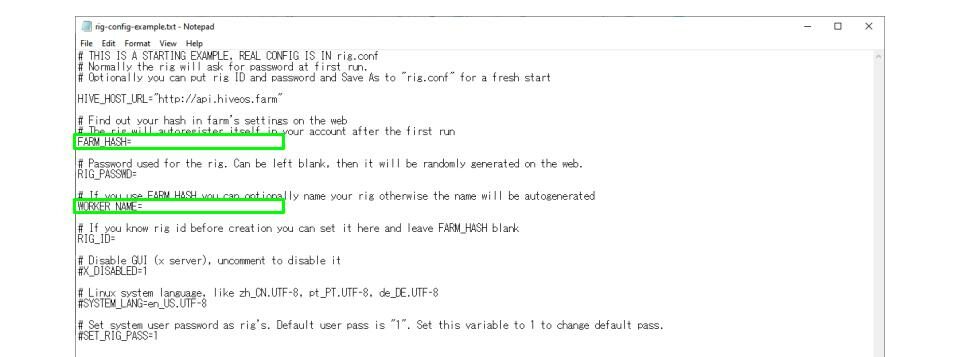
In the text editor, the file will look as follows. We will be adding a farm hash and worker name to the file. Paste the farm hash you copied from the Hive OS dashboard, and create a worker name for your rig.

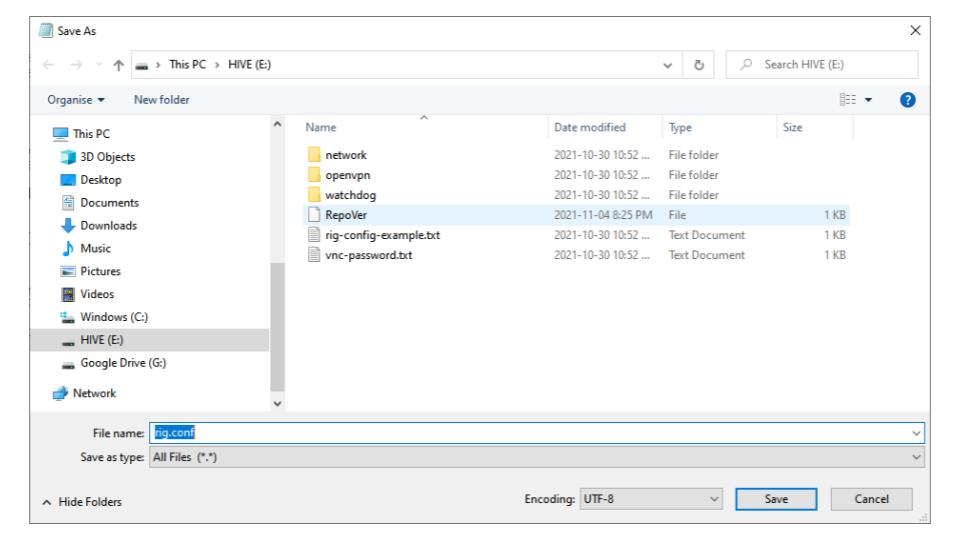
Once updated, save the file as rig.conf (it must be saved with this exact name or Hive OS will not load the information on start up). Sometimes the file is saved as a .txt extension. Be sure to double check in file explorer and modify the extension to .conf if required.

The USB/SSD can now be safely removed and installed into the new rig. The remainder of the set-up will be done through the Hive OS web interface. Your new rig will need to be fully built, with the drive installed and connected to the internet. It is recommended to connect a monitor when you first start the rig up. If there are any issues, you will be able to diagnose them much easier with a monitor. If the SSD/USB has been set-up properly and there are no hardware issues, your system should run without problems.
-
-
Hive OS Settings
Before setting up Hive OS, we should discuss how the program organizes your mining rigs. There are three main levels:
- Farm level – A farm is defined as a group of one or more rigs
- Rig level – A rig is a single mining machine, a rig may have multiple GPU’s on it
- Worker level – An individual ASIC or GPU
When setting up Hive OS, you can decide whether you want settings to be applied at the farm level, rig level or the worker level. For example, when adding a wallet, it can be created at the farm or rig level. If set up at the farm level, it can be applied across multiple farms. At the rig level, it can be applied across multiple rigs in the same farm. This allows you to decide which settings you want to be applied globally across multiple farms or multiple rigs. The settings can be applied in bulk to your mining operation for ease of use. In this guide we will be creating wallets and flight sheets at the farm level and applying overclock settings at the worker level.

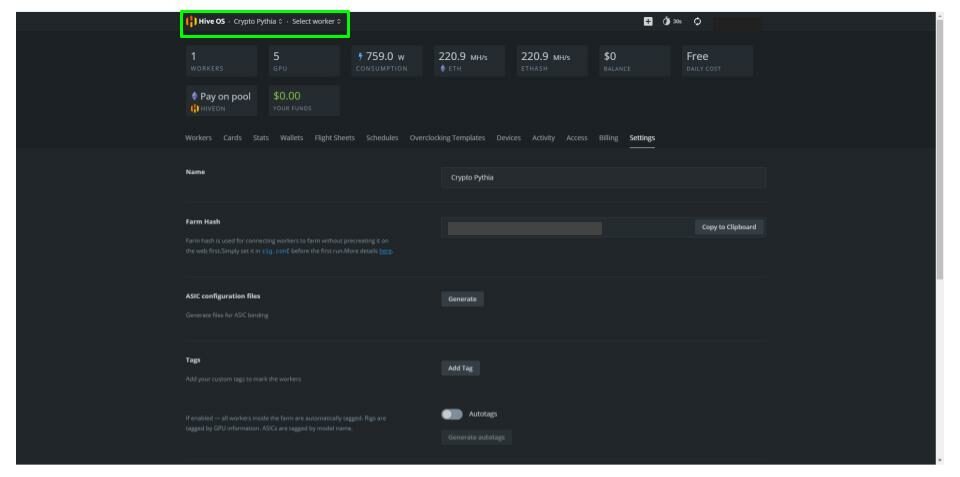
When logged into the Hive OS Web Interface, the top left bar serves as navigation for the three levels. The Hive OS icon takes you to the farm management level, the first drop down menu allows you to select a farm and the last drop down menu allows you to select rigs. These menus will tell you which farm, and rig you are managing at all times.
-
-
Update Hive OS
When downloaded, Hive OS is often not the most up-to-date version. The first step after getting the software up and running is to update it to the most current version. This is done at the rig level. Log into the Hive OS web interface and select your farm.

Choose the new rig.

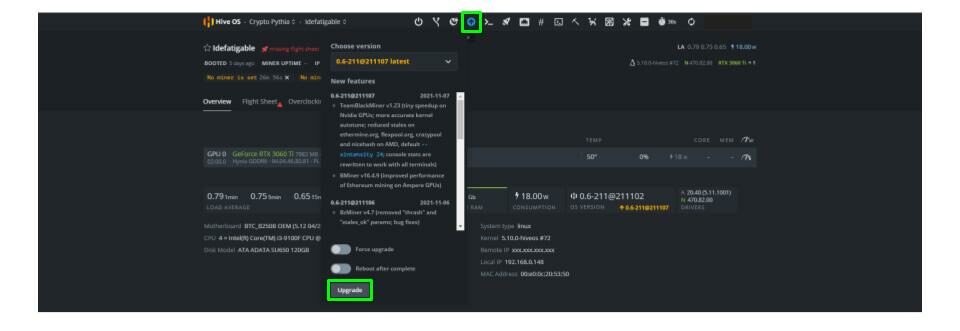
In the top bar, the fourth icon from the left will be an upward pointing arrow in a circle. If there is a newer version of Hive OS, it will be orange. Click on it, it will turn blue and a new window will pop-up. Click on upgrade.

-
Add Wallet
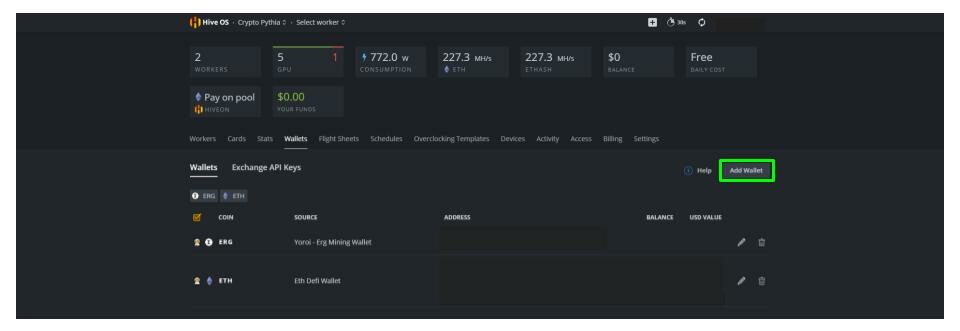
Now that Hive OS is running the most up to date version, lets set up a wallet. Select your farm using the navigation menu at the top and select the wallet tab. Any wallets added here, will be accessible to any rig on this farm.

In the wallet tab, choose add wallet. As you can see, we already have 2 wallets set up for this farm an ETH wallet and an Ergo wallet. Read our cryptocurrency wallet article if you are need more information on how to choose and set up a new wallet.
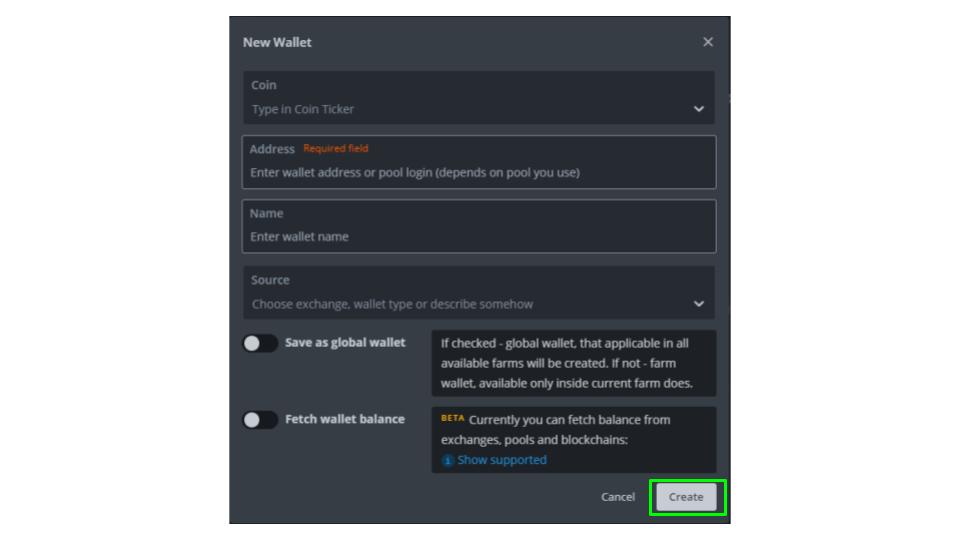
 In the pop-up window select a coin, paste in your wallet address and create a name to identify the wallet. You can also choose a source (an exchange etc.) if this is applicable. The two toggles will allow you to make the wallet global, and have Hive OS fetch your wallet balance (this is a beta feature).
-
Create a Flight Sheet
Flight sheets are used to tell your workers which algorithm to use, which mining software to use and what pool to mine to. They can also be modified, similar to a Bat file in Windows. In this example, we are going to create a flight sheet to mine ETH to the Ethermine pool using NBminer. If you want to learn more about adding additional arguments, take a look at our article about setting up Dual Mining with T-Rex Miner.
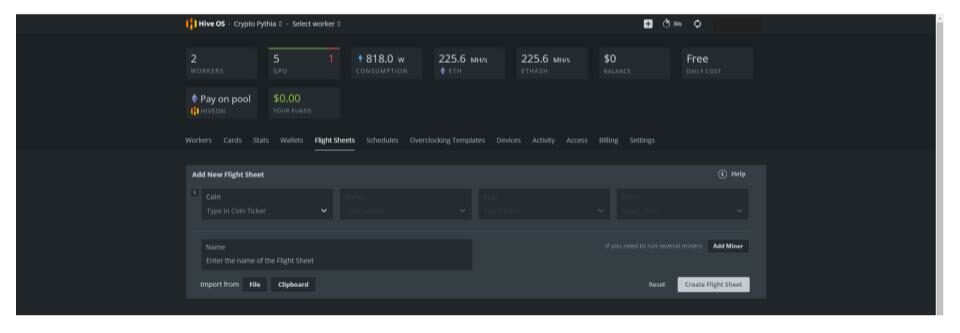
First select your Farm and then choose the flight sheets tab.

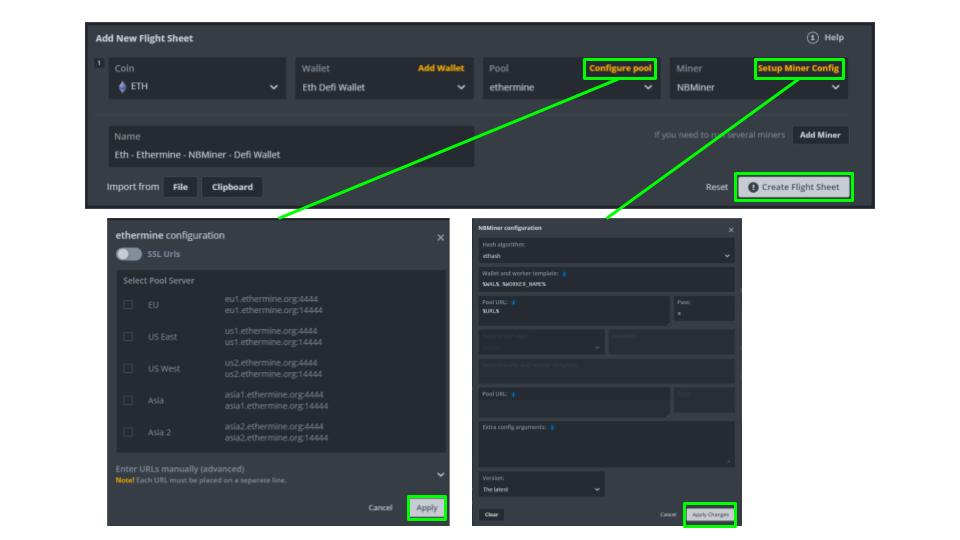
Select a coin, your wallet, the pool and the mining software you wish to use. You can click on the configure links, to modify the pool and the miner. For the pool, choose the location closest to you (see our articles about pool latency, pool payouts and mining websites for more information about choosing the right pool for you). Click on Setup Miner Config, and double check that the miner is set to the latest version. Save the settings and create the flight sheet.

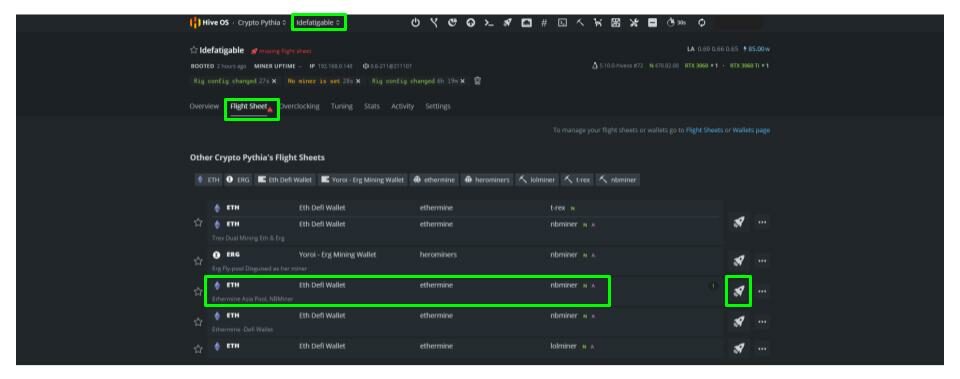
Now we must apply the flight sheet to the mining rig. To do this, use the top navigation bar to select the new mining rig. Choose the flight sheet tab and find the one you just created. Click on the spaceship icon to the right and apply the settings to your rig.

The flight sheet tab should now look like the image below, with your selected sheet at the top.

-
Overclocking
One of the nice features about Hive OS is it’s overclock settings. Hive OS stores the the overclock settings 0f all its users in a database. You can then sort these based on the mining algorithm and popularity, and apply the same settings to your cards. This is a broad method of overclocking your cards. If you want a step-by-step guide on how to overclock your cards for maximum profit and efficiency read our Windows GPU Overclocking article. The same method can be used for your cards in Hive OS.
With your rig selected in the top menu choose the overview tab. It will list all of the workers you have in that rig. Overclock settings are applied to each worker individually, this allows for different cards to have different settings. On the right hand side of each worker there is a speedometer icon. Click the icon and a new window will pop-up

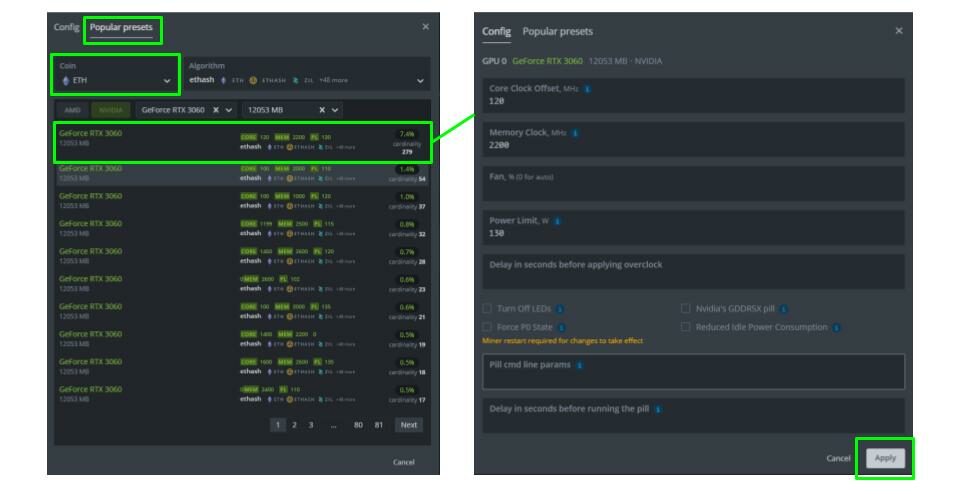
In the new window select the Popular Presets tab, choose the coin/algorithm you are mining. A list of presets ranked by the number of people currently using them will be generated. You can select from these presets by double clicking them and selecting apply. Repeat this for all the cards in your new rig.

Note: this is the fast and dirty method of overclocking. Every card, coin and sometimes even miner, may require slightly different overclock settings to be optimal. This is a great way to get started, but it is worthwhile going through each card and finding the optimal overclock settings. This is a much longer process that involves incrementally changing your settings and comparing your mining rates. Read our guide on overclocking (Using Windows) for how to perform this process, and an excel template you can use to track your results.
-
Conclusion
You have now successfully added your first rig to Hive OS. The next step is to monitor, optimize and get more comfortable with the program. Have fun Mining.
Hi I’m Mike, an active crypto investor DeFi enthusiast and crypto miner. I have been involved in crypto since March of 2021 and in DeFi since May 2021.
I’m also an avid outdoor adventurer!



 In the pop-up window select a coin, paste in your wallet address and create a name to identify the wallet. You can also choose a source (an exchange etc.) if this is applicable. The two toggles will allow you to make the wallet global, and have Hive OS fetch your wallet balance (this is a beta feature).