May 19th 2022| Mike Humphrey
What is Avalanche (AVAX)
Avalanche is a layer 0 blockchain with an open, programmable smart contracts platform for decentralized applications. Launched in September of 2020 by New York based AVA labs, it is currently the third largest blockchain by TVL with over 200+ DApps. The flourishing community includes platforms like Curve, Trader Joe, Pangolin, Aave and even Defi Kingdom’s Crystalvale. Avalanche has been built a little differently than many of the other Ethereum alternative block chains. It runs on the Ethereum Virtual Machine, but consists of the 3 chains that each perform different functions. They are X-Chain, P-Chain and C-Chain. X-Chain is used to exclusively create and exchange tokens. P-Chain coordinates Avalanche validators and creates subnets (where developers can create their own proprietary blockchains secured by the Avalanche network). C-Chain executes and allows interaction with smart contracts and Defi protocols.
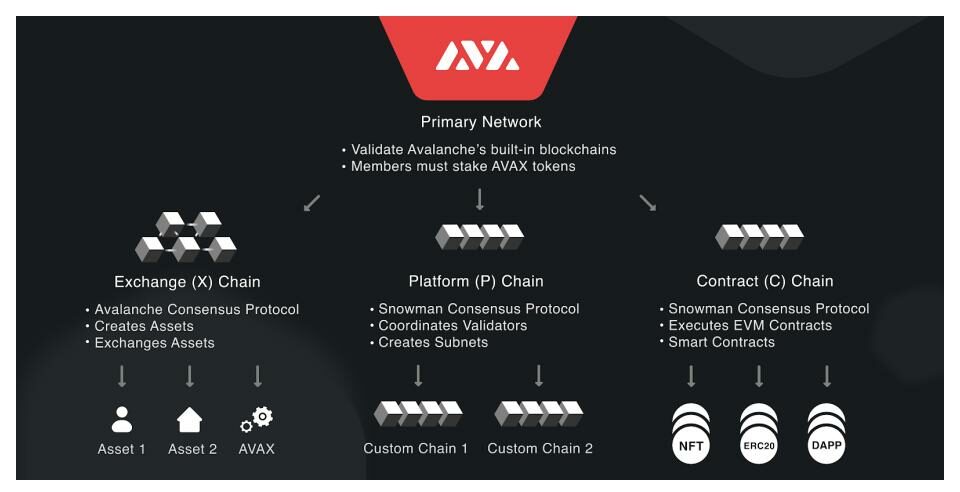
AVAX is the gas token for the Avalanche chain. With it you can pay for transactions on the network. Below we will guide you on how to Buy AVAX and transfer it to a web wallet that will allow you to interact with the DeFi protocols on the Avalanche network.
Avalanche Wallets
Because Avalanche works on EVM, any Ethereum compatible wallet will work with Avalanche. Metamask due to its popularity and ease of use is a good choice (How to Add Avalanche to Metamask). Below is a list of some of the wallets that will work on Avalanche. For more information read our article about cryptocurrency wallets. We also recommend purchasing a hardware wallet to secure your funds. Ledger and Trezor both offer Metamask compatible hardware wallets. Read our article about how to keep your crypto safe to find out what you can do to prevent your crypto from being stolen.
Where to Buy AVAX Crypto
-
Buy AVAX Token on an Exchange
In order to buy AVAX with FIAT you will need to purchase the token from an exchange. Once bought, you can then transfer the token from your exchange wallet to your personal wallet. There are many exchange options available including Coinbase, Kucoin, Kraken, Bitfinex and more. If you have a Crypto.com account, you can purchase AVAX directly with a credit card, bank transfer or crypto and send it to your web wallet with zero transaction cost. Below is a step by step guide on how to purchase and transfer AVAX using the crypto.com app. If you sign up with our link you will receive a 25USD$ credit in your account as do we. You can read our article about how to buy crypto currency if you want to know more about the other options available.
**NOTE:You must set up your crypto wallet on Avalanche C-Chain before you can receive your tokens in your wallet.**Crypto.com How To
-
Buy AVAX
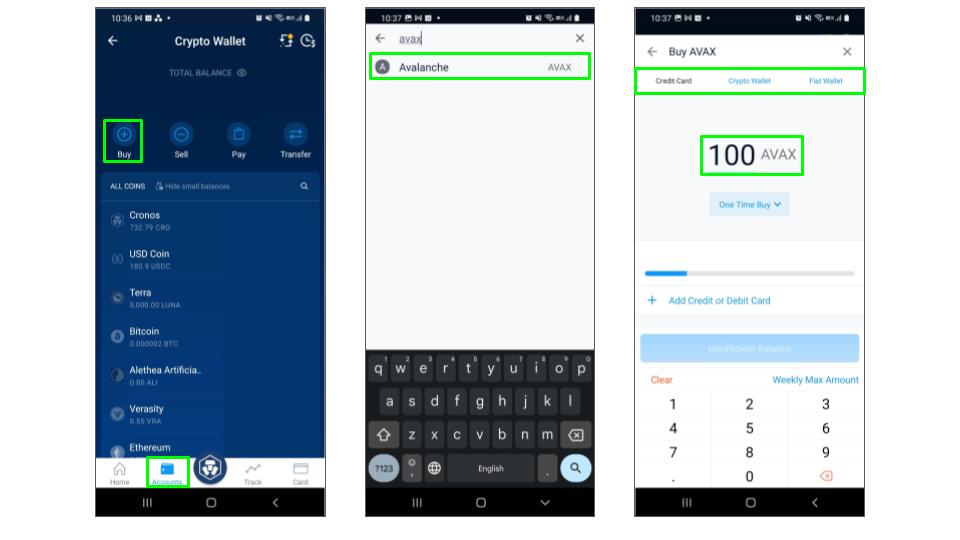
To purchase AVAX sign into the Crypto.com app, choose Accounts from the bottom bar and select buy. On the next screen search for and select AVAX. Once selected you can then choose your payment method and the amount you want to purchase. Click purchase.
-
Transfer AVAX to Web Wallet
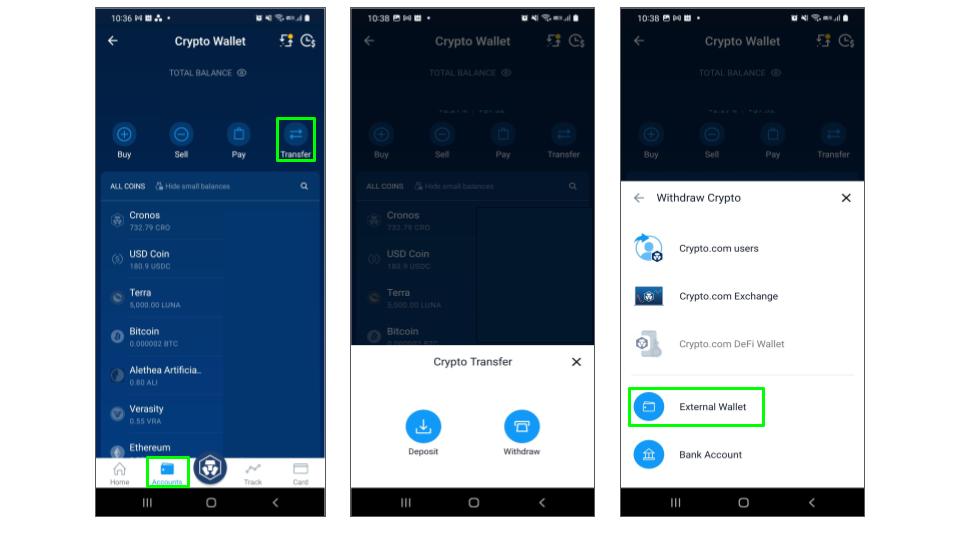
Once the transaction is complete, you will have AVAX in your crypto.com wallet. In order to use the AVAX with DeFi protocols, you will need to move the AVAX to your personal wallet. To do this again selects Accounts at the bottom of the screen and then select Transfer. Choose to Withdraw and then select External Wallet.
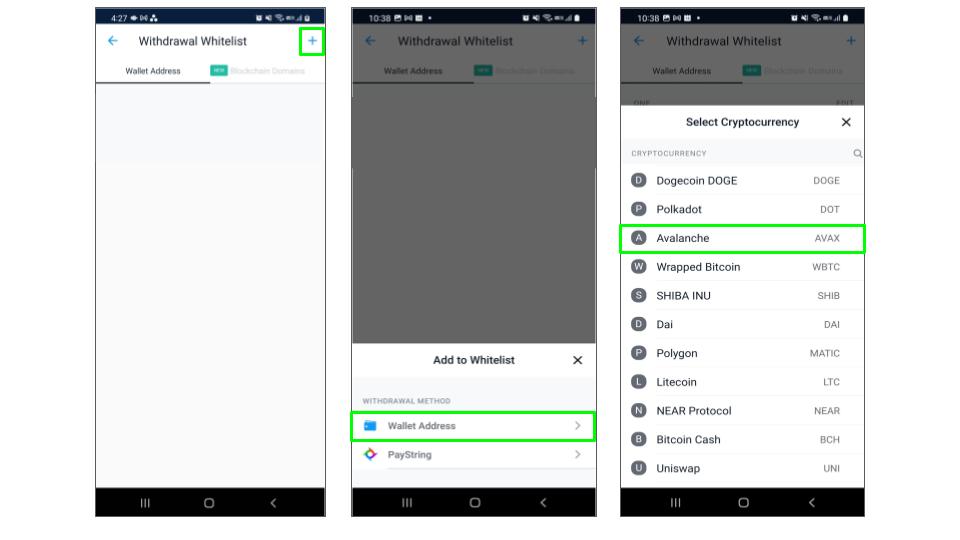
Click the + icon in the top right to add your web wallet to the Whitelist and then choose Wallet Address. You will be asked to choose which cryptocurrency you want to withdraw, select AVAX.
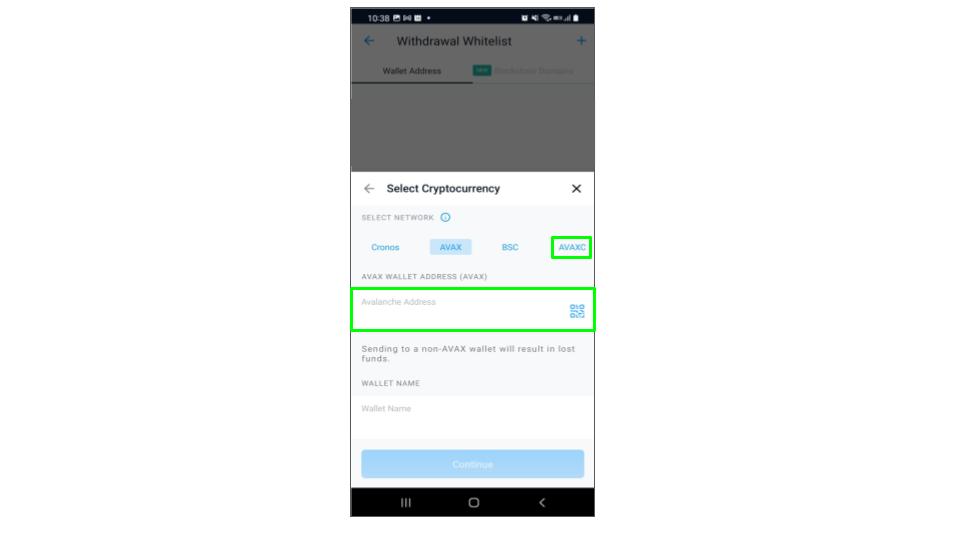
In the new pop-up window, choose AVAXC as the network (this will transfer your assets to C-Chain), and enter your wallet address.**Note: if you do not choose AVAXC your tokens will be transferrred to the wrong chain!**
We recommend adding your wallet using the QR code scanner to prevent errors. You can also add a wallet name so you can distinguish the wallet later on. Click continue and follow the required steps. If you have 2FA activated, you will need to enter your security code to complete the transfer.
Crypto.com will confirm the transfer and your funds will appear in your wallet (this may take some time). You may need to add the AVAX token address to your wallet before your balance is visible in your wallet. Follow the add token section in our Add Avalanche to Metamask article
-
-
Avalanche Bridge – Transfer to Avalanche
If you already own crypto and want to transfer it to Avalanche you can bridge the assets over. Your tokens will be wrapped into the Avalanche chain equivalent at the same value. There are several options available to move your funds from one chain to another. You will require AVAX in your wallet before you can perform transactions on Avalanche. You can either purchase it from an exchange, or swap your tokens on another chain for wrapped AVAX and bridge the wrapped AVAX to Avalanche. The AVAX will be unwrapped once the transfer is complete and can then be used for gas fees.
-
-
Avalanche Bridge (From EthereumMainnet)
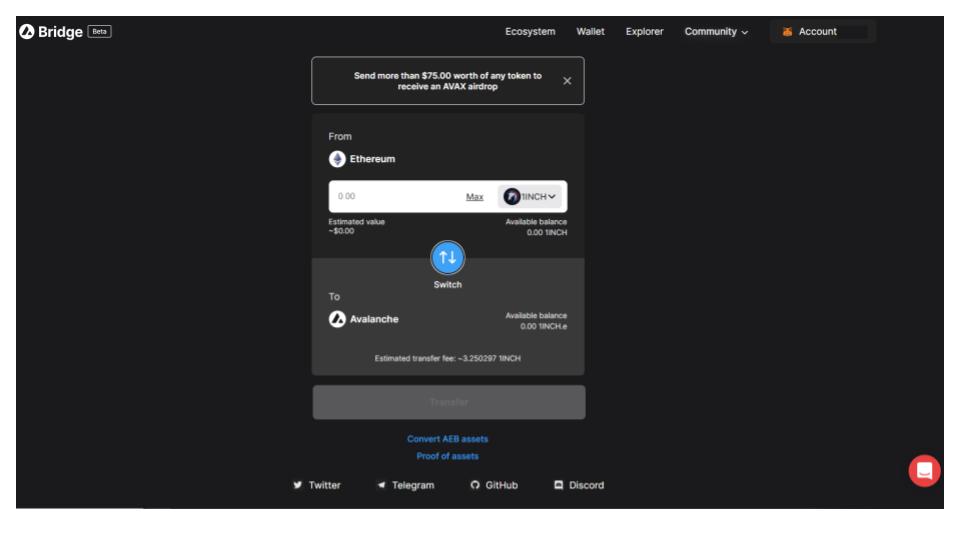
The Avalanche Bridge can transfer ERC20 tokens from Etherum Mainnet. The other benefit of using the bridge is that if you move 75USD or more to Avalanche you will receive an AVAX airdrop that will cover the cost of your first couple of transactions. This means you can transfer any asset and then swap it for enough AVAX once you are on C-Chain. If you are transferring from a chain other than mainnet (Polygon, Fantom, Arbitrum, Harmony etc) use one of the other options below to avoid the high cost fees on Ethereum.
-
Synapse (Multi-Chain)
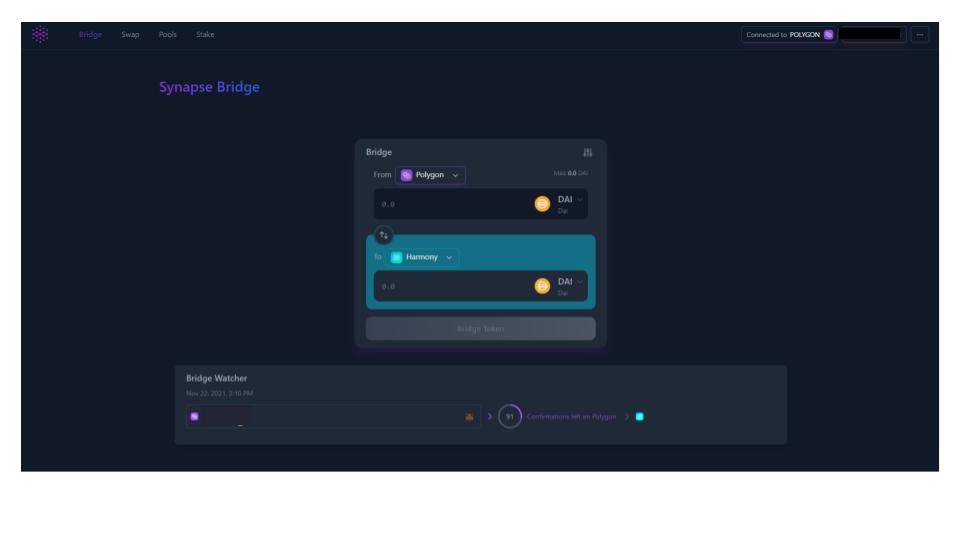
Synapse is a cross chain swap protocol that allows you to transfer directly from one chain to another. Synapse also has cross chain pools as well as their own nUSD & nEth wrapped tokens. Use synapse if you have cryptocurrency sitting on another chain and you want to transfer it directly to Avalanche.
-
Anyswap (Multi-Chain)
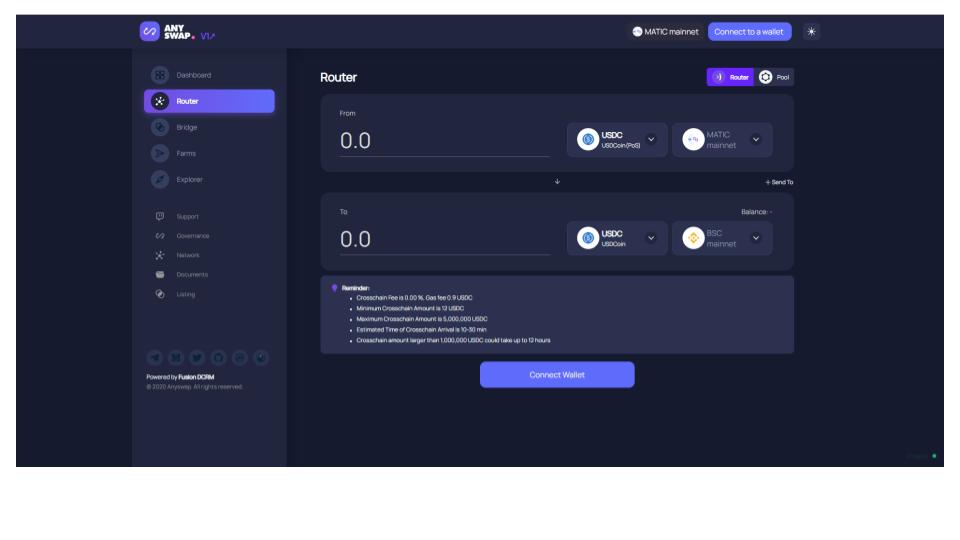
Like synapse, Anyswap is a cross chain bridge that allows you to swap directly from one chain to another.
-
-
Avalanche DEX’s – Swap for AVAX Tokens
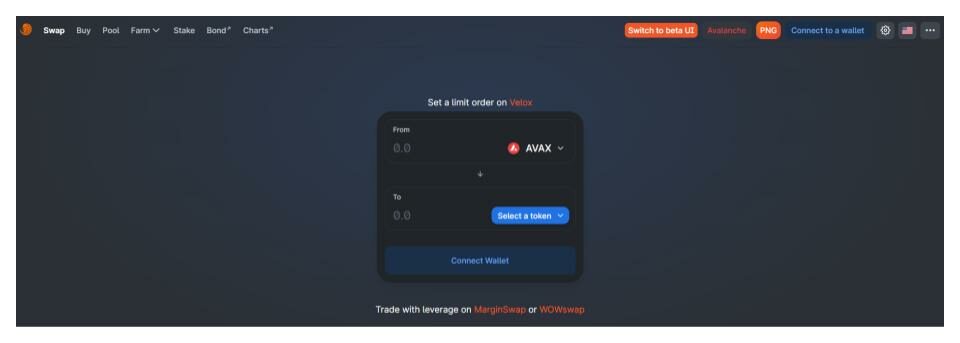
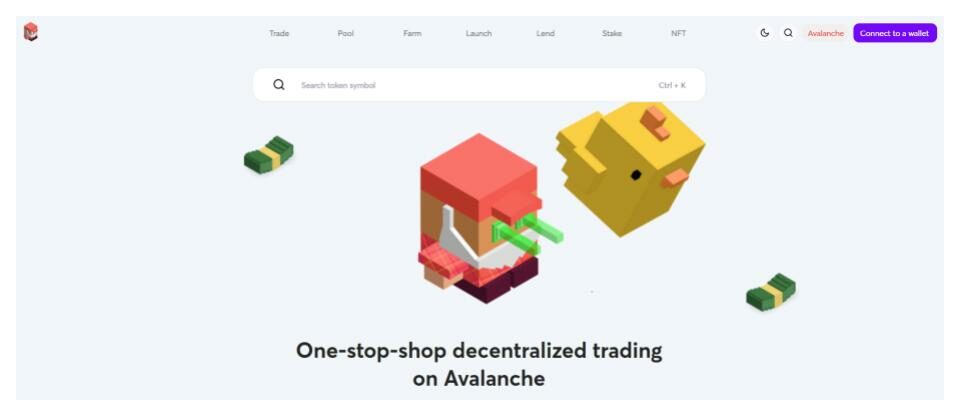
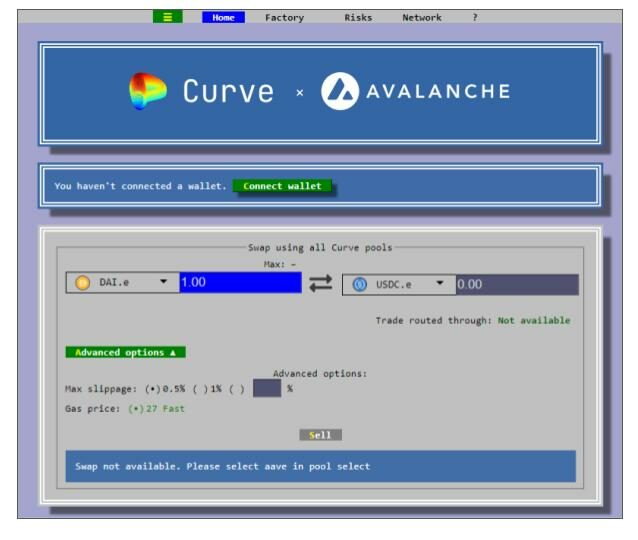
Once you have funds on Avalanche C-Chain, you will need AVAX tokens in your wallet in order to pay gas fees. You will need to use a swap protocol to trade your bridged tokens for AVAX. The following are some major swap protocols on Avalanche. All three platforms offer liquidity pools, farming and staking opportunities as well. Be sure to check out some of the great yield farming opportunities.
Welcome to Avalance
What do you think of Avalanche? Whats your favorite protocol? Let us know in the comments below!
Hi I’m Mike, an active crypto investor DeFi enthusiast and crypto miner. I have been involved in crypto since March of 2021 and in DeFi since May 2021.
I’m also an avid outdoor adventurer!
May 11th 2022| Mike Humphrey
What is Crystalvale
If you haven’t heard, the Defi Kingdoms dev team announced in early December 2021, that they would be creating a new realm called Crystalvale on the Avalanche block chain. The highly anticipated cross-chain expansion of the ever popular Defi Kingdoms franchise promised the development of a new game token $CRYSTAL, new heroes and a plethora of new quests. For those DFK veterans it was a welcome surprise and an opportunity to get in on the game again at the ground floor.
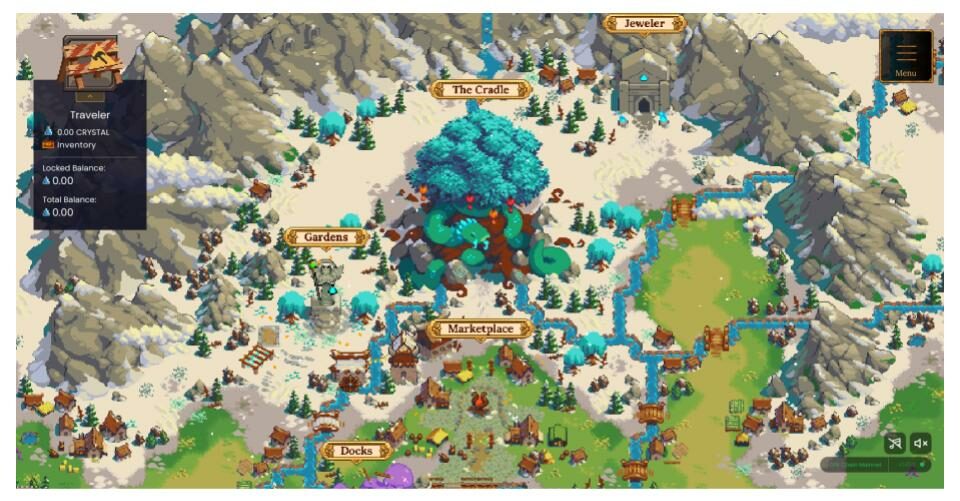
Crystalvale is designed off of the original Serendale kingdom and has many of the same features and areas, but with a new feel. Once in the game you will recognize the standard Serendale areas including the Marketplace, Docks, Gardens and Jeweler. Instead of the castle however, you will notice the cradle at the center of the map. Along with a different look and feel the game also introduces a number of new NPC’s and what looks like a much richer back story. There are quite a few little Easter eggs hidden throughout the realm and it’s worth taking a bit of time to explore.
Another big difference between Serendale and Crystalvale is the chain it operates on. Serendale uses the Harmony block chain and transactions require the $ONE token to pay the gas fees. Crystalvale however operates on a proprietary subnet on the Avalanche eco system. The new DFK chain uses the in game $JEWEL token to pay gas fees. This is a big bonus for those long time $JEWEL farmers as it increases the long term utility of the token
Avalanche and DFK Chain
In order to bring the world of Defi Kingdoms to Avalanche, the DFK dev team partnered with AVA Labs to create and pioneer the first GameFi Avalanche subnet. Avalanche subnet technology allows projects to section off a group of Avalanche validators and commission them to validate transactions outside of the primary chain. By commissioning the DFK Subnet Defi Kingdoms is now able to run and manage it’s own proprietary EVM blockchain for Crystalvale. A huge step forward for the franchise.
Why Create the DFK Subnet?
JEWEL as Gas Token
By creating a proprietary Defi Kingdoms subnet the $JEWEL token can evolve from just being the Serendale governance token to the Network Gas Token of the new chain. Players will use $JEWEL to pay for transaction on the DFK chain, increasing it’s utility and burn rate.
What Happens to the Gas Fees?
- A portion is used to pay commissions to the chain validators
- A portion is burnt (deflates the $JEWEL supply and increases the token value)
- A portion is sent to the Quest Fund which will be used to reward the community and players
Bridging from Harmony to DFK Chain
The DFK dev team has made bridging from Harmony to Avalanche a relatively simple process. The Dockmaster has an inter-chain bridge built in, that will allow you to transfer directly from Serendale to Crystalvale with minimal hassle. Follow the steps below to bridge your $JEWEL tokens to the new DFK chain and begin farming $CRYSTAL.
-
-
-
$JEWEL
As mentioned above, the DFK chain uses $JEWEL as the gas token. You will need bridge $JEWEL to the new network in order to be able to perform transactions on the new chain. You will need to have $JEWEL in your wallet in order to bridge to the new chain. You can add $JEWEL to your wallet from
-
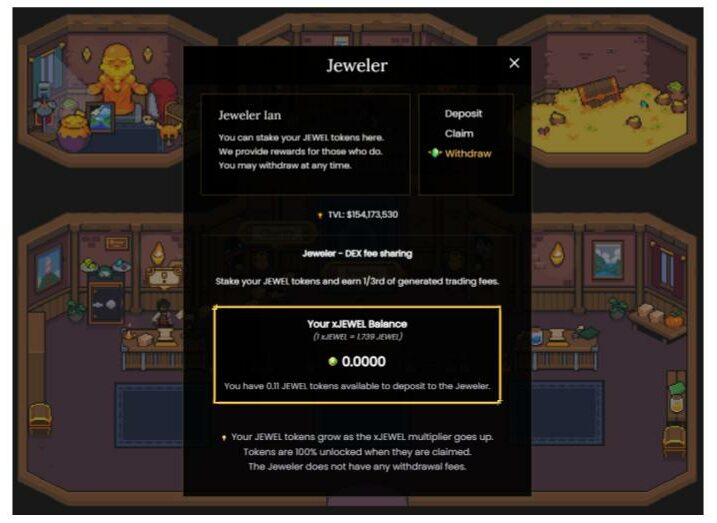
The Jeweler
xJEWEL can be withdrawn as $JEWEL from the Jeweler and then be transferred to Crystalvale.
-
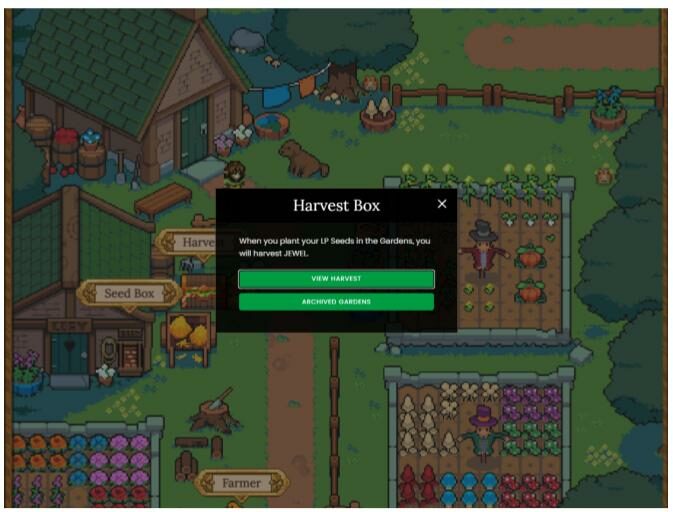
The Gardens
Garden $JEWEL rewards can be harvested and then transferred to Crystalvale.
-
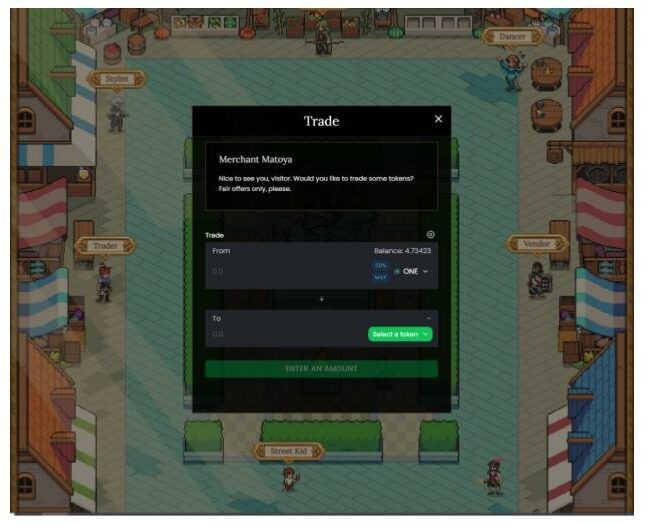
The Trader
You can use the Trader in the Marketplace to exchange tokens or questing rewards for $JEWEL which you can then transfer to Crystalvale.
-
Purchased with FIAT on Ramp
You can also use the following guide to transfer FIAT to Harmony and then bridge your assets Crystalvale.
-
-
-
Dockmaster -Bridge from Serendale to Crystalvale
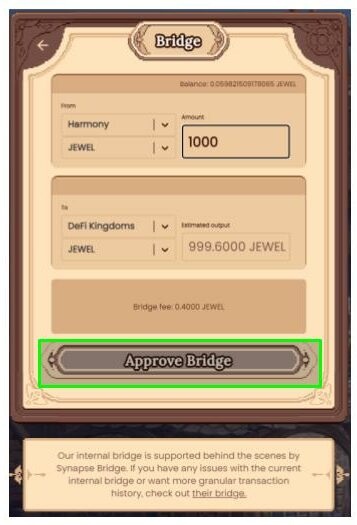
With $JEWEL in your wallet you can now bridge assets from Harmony blockchain to the DFK Chain on Avalanche. Bridging simply moves your assets from one blockchain to another. To do this visit the Dockmaster and choose bridge tokens.
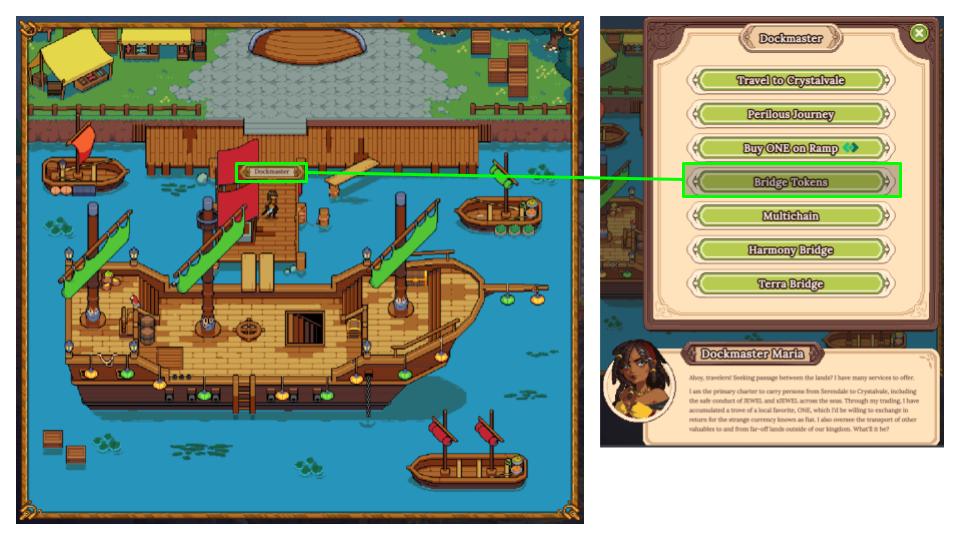
Enter the number of tokens you want to move to Crystalvale and click Approve Bridge. Then approve the transaction in your crypto wallet.
-
Dockmaster – Travel to Crystalvale
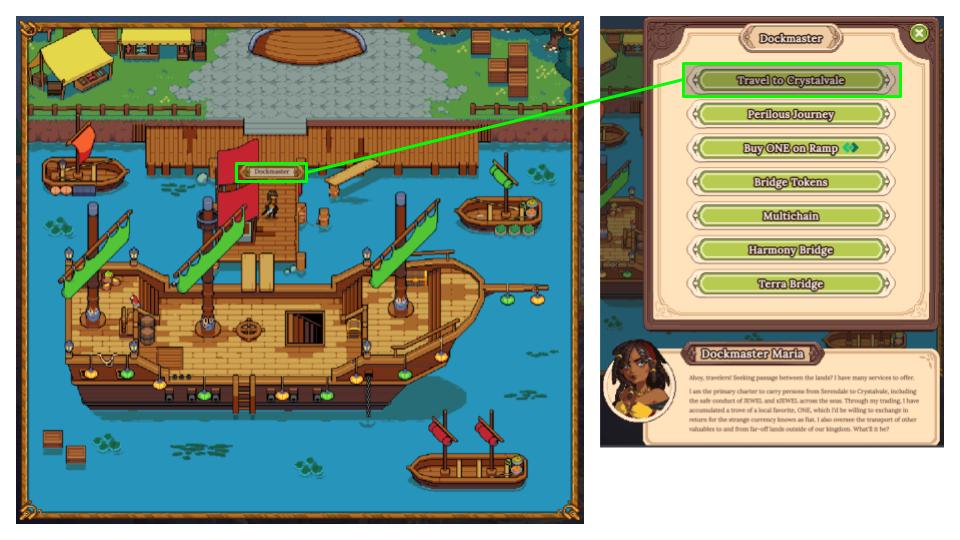
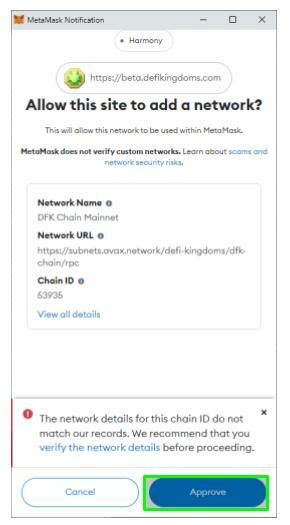
Now that your $JEWEL tokens have been successfully bridged, use the Dockmaster to travel to Crystalvale. The new realm does not use a different web interface (the web address is the same). To move from one realm to another you simply need to access it via the different chain in your wallet. When you click Travel to Crystal Vale, your wallet will pop up asking if you would like to add the DFK Chain to your wallet. This is much easier than manually inputting the DFK Chain RPC details. Once the added, the site will reload and take you to Crystalvale.
-
Trade Your Tokens
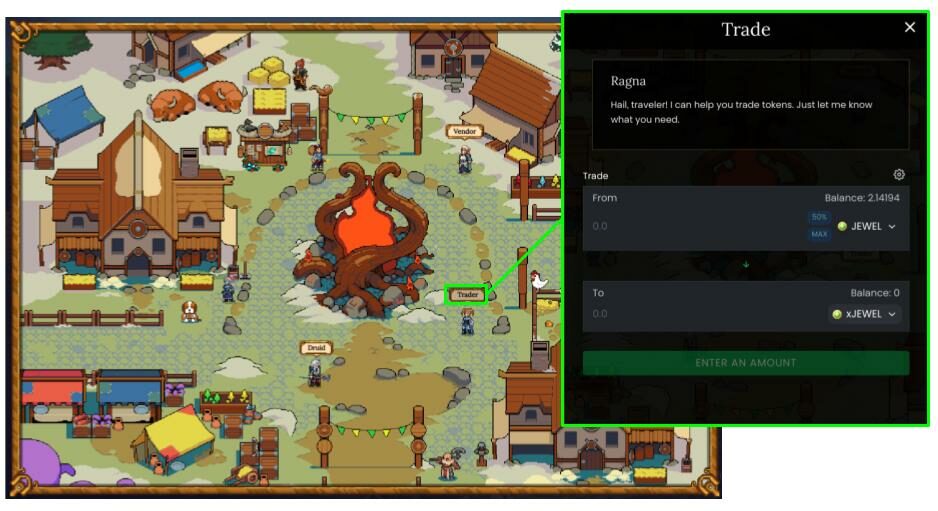
Once you have arrived you can exchange your $JEWEL tokens for one of the other tokens currently available on the DFK Chain (xJEWEL, AVAX, USDC etc.). You will need to swap 50% of your $JEWEL for one of these other tokens in order to purchase seeds which can then be planted in the Garden.
**Note if you use all of your JEWEL to purchase seeds, you will no longer have tokens to pay the gas fees. Plan to leave a small portion of JEWEL in your wallet for transactions.**
-
Buy Seeds
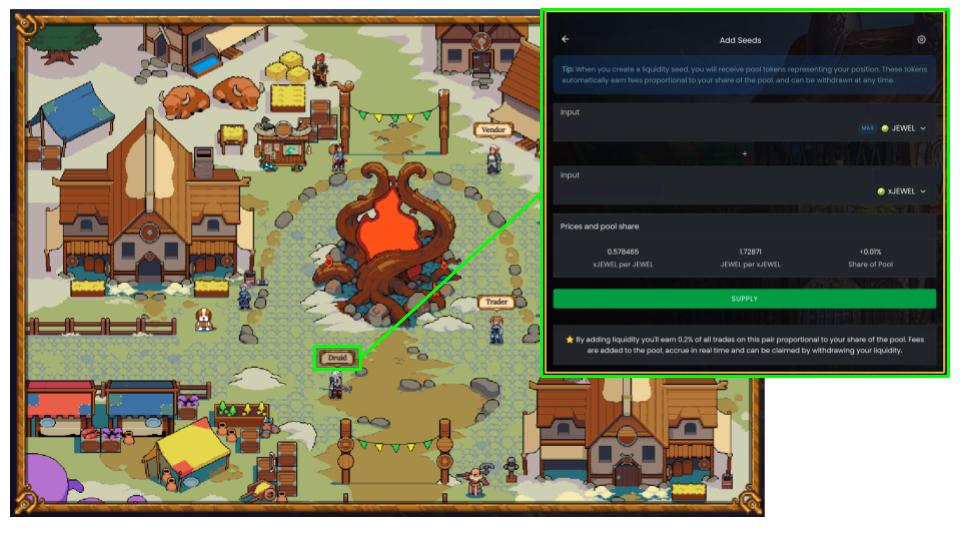
Just like Serendale, Crystalvale also has Druid in the Marketplace where you purchase seeds. Using the newly traded tokens and your $JEWEL you can now purchase liquidity pool seeds.
-
Plant Your Seeds
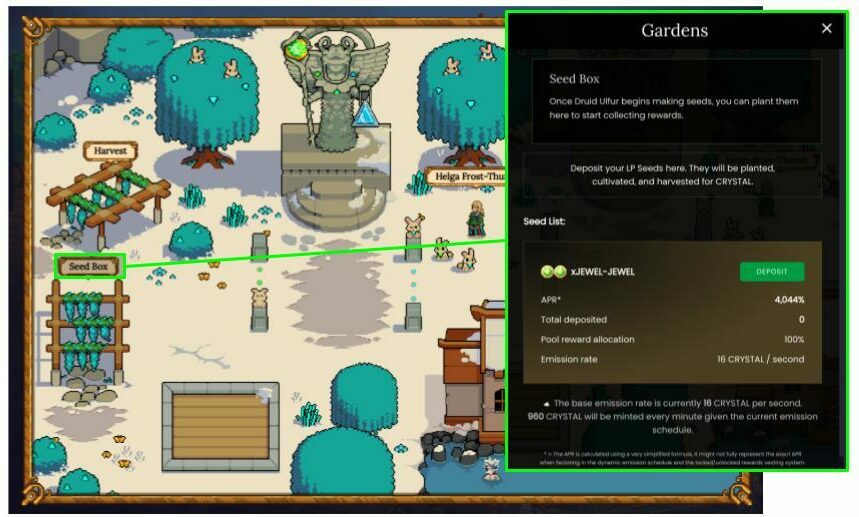
With your new seeds in your pocket, head to the Gardens where you can deposit the seeds in the seed box to be planted.Once planted your new gardens will be generating $CRYSTAL
-
Jeweler
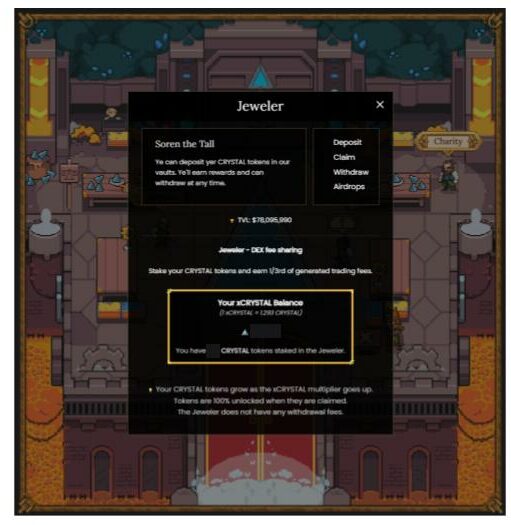
As you harvest your $CRYSTAL you can deposit it at the Jeweler for xCrystal, or you can use it to compound your returns by purchasing more seeds and depositing them into the Gardens.
-
Conclusion
Crystalvale and the DFK chain promises to be a great new addition to the DFKverse and we are super excited at the opportunity to get involved at the beginning of a new project. We are looking forward to new heroes and quests as they become available.
What are your thoughts on the DFK Chain and Crystalvale? Let us know in the comments!
Hi I’m Mike, an active crypto investor DeFi enthusiast and crypto miner. I have been involved in crypto since March of 2021 and in DeFi since May 2021.
I’m also an avid outdoor adventurer!
January 17th 2022| Mike Humphrey
Level Up Requirements
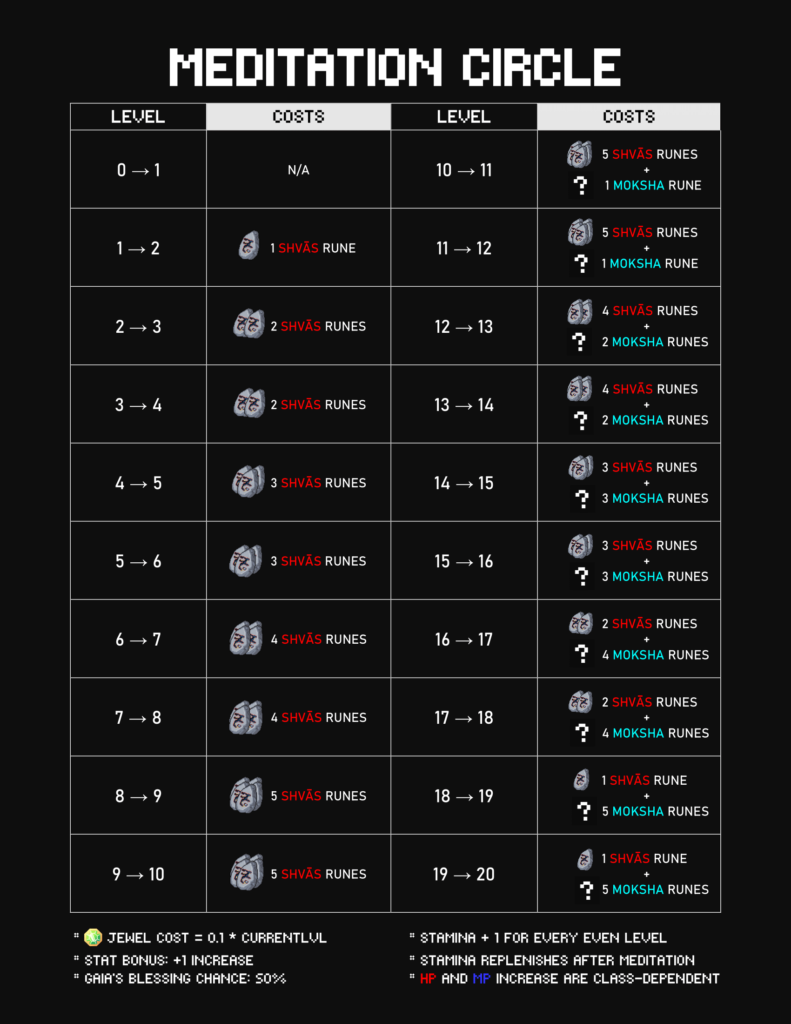
In order to level up, your hero needs to have gained enough experience, collected enough Runes, and have enough JEWEL.
Items Requirements
- Shvās Rune: Can be found questing with your hero or you can purchase them from the trader in the market place
- Moshka Rune: Moshka Runes are required to level up past level 10
- Jewel: You will need 0.1*(hero’s current level) in order to level up
See the diagram below for details on how many Runes are required for levels 1 – 20.
Experience Requirements
To level up your hero must have gained enough accumulated XP to fill their experience bar. For a level 1 hero 2000XP is required in order to become a level 2 hero. The experience required per level increases as your hero levels up.
How Leveling Up Works

When you level up, your hero has a chance to increase it’s base stats. Whether a given stat increases, depends on probability and your hero’s primary and secondary classes. You also have the opportunity to select one stat that is guaranteed to increase by +1 and 2 other stats that each have a 50/50 chance of increasing. When you level up the algorithm “rolls a die” four times to generating random numbers, which are then used to determine whether a given stat will increase. The probability for a stat to increase can be can be found in the Hero Base Stats – DeFi Kingdoms Google sheet.
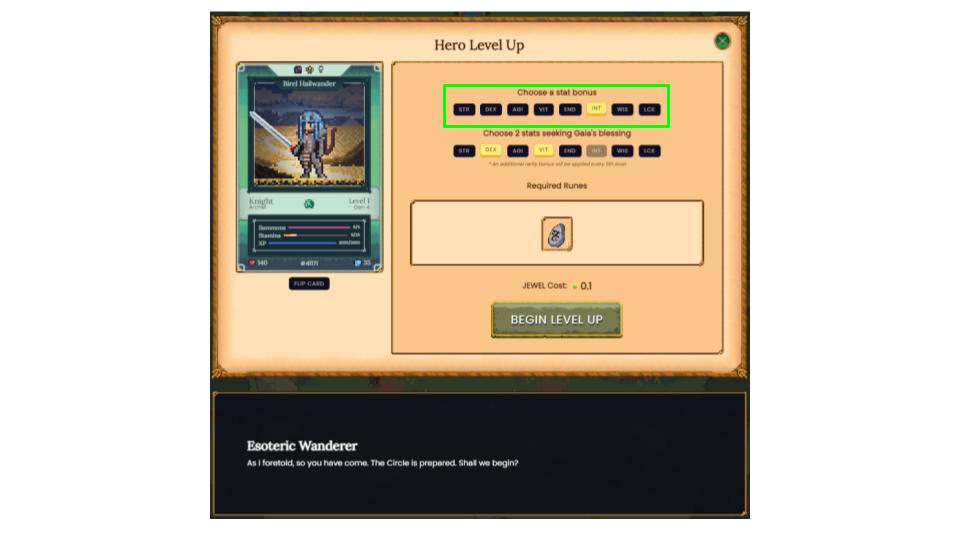
Step 1 – Stat Bonus Selection
The first step in leveling up is choosing the stat bonus. This is a guaranteed +1 increase for any stat that you select.
Step 2 – Primary Stat Growth (Roll 1)
Step 2 is probability based. A randomly generated number between 1 – 100 is compared to the primary stat values for your character. If the number generated is less than or equal to the primary stat value then that stat will increase by +1. Below is a table showing the Primary Stat Values for a Knight.
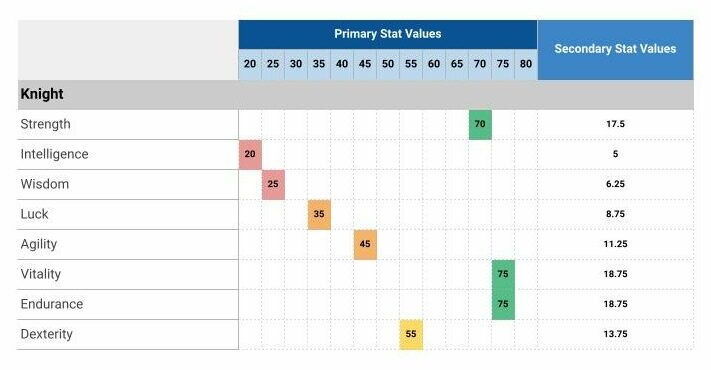
For example, if a 50 was rolled for the knight above, Strength (70), Vitality (75), Endurance (75) and Dexterity (55) stats would increase because their stat values are greater than 50. Intelligence (20), Wisdom (25), Luck (35) and Agility (45) would not increase because their values are less than 50. The number that is compared to the Primary Stat Value is randomly generated and will be different each time you upgrade.
Step 3 – Secondary Stat Growth (Roll 2)
The secondary stat growth depends on the secondary class of your hero. A second number between 1 – 100 is randomly generated and is compared to the Secondary Stat Values. If the number generated during the second roll is less than or equal to the secondary stat values, then that stat will increase by +1. Below is the Secondary Stat Values for an Archer.
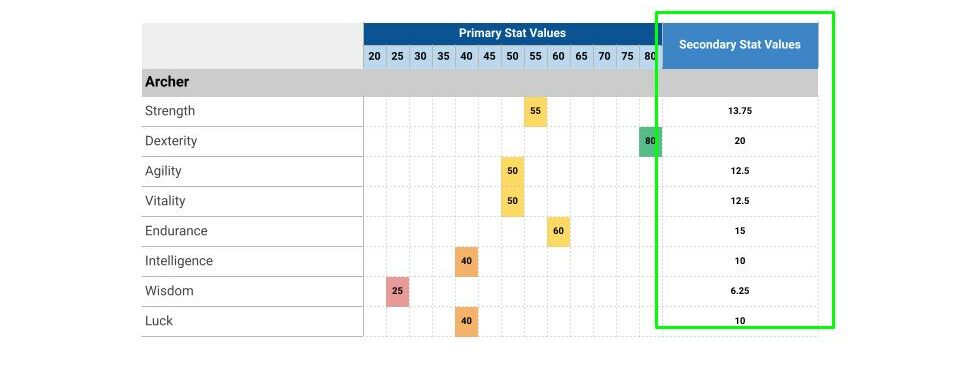
For example, if the second roll gave us a 19, then Dexterity (20) would increase. Strength (13.75), Agility (12.5), Vitality (12.5), Endurance (15), Intelligence (10), Wisdom (6.25) and Luck (10) would not increase.
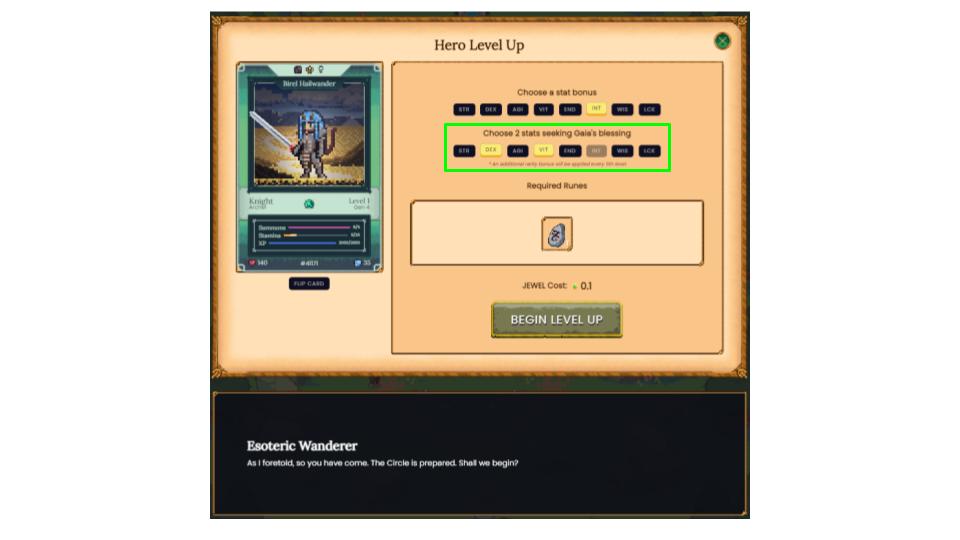
Step 4 – Gaia’s Blessings (Roll 3 & Roll 4)
Finally the two selected stats for Gaia’s Blessing are considered. Each has a 50/50 chance of a+1 increase.
Choosing Which Stats to Upgrade
Below is a guide on how to optimize the stats you choose for your your hero’s Stat Bonus and Gaia’s Blessing.
-
Hero Profession & Critical Stats
Your hero’s profession determines which stats are the most important to focus on. The following is a list of each profession and the stats that have the greatest impact on successfully performing quests. The higher these critical stats increase, the greater the rewards your hero will receive when performing quests.
Mining (Strength & Endurance)
Gardening (Wisdom & Vitality)
Foraging (Dexterity & Intelligence)
Fishing (Agility & Luck) -
Compare Profession Stats to Primary Stat Growth Chart
Once you have determined the profession you want your hero to focus on, compare this to the Hero Base Stats – DeFi Kingdoms Google sheet. Using the Google sheet identify your hero’s strengths and weaknesses. The stats that have a high chance of increasing will increase naturally over time as you level up your hero. If your hero’s base and secondary stat growth do not match your hero’s profession, you can use the stat boosts to increase the chances of these stats increasing when you level up.

For example a Knight Forager, needs to increase Dexterity & Intelligence. However, the chance of increasing intelligence is only 20% and Dexterity is 55%. For a knight forager choose Intelligence as the guaranteed stat increase and choose Dexterity for the Gaia’s Blessing and Wisdom as the second Gaia’s Blessing. This means that your heroes foraging stats have a greater chance of increasing, but you may also increase your hero’s strength as as Gardener (because high Wisdom and Vitality (75) could allow the hero to be used for gardening). -
Choose Stats to Boost
Once you have identified your hero’s strengths and weaknesses, you can select the stats you want to focus on to when leveling up. Identify the most critical stats you want to increase and choose these for the guaranteed increases. The next two most important stats and can then be chosen as the Gaia’s Blessing. Using this strategy you have the highest chance of successfully increasing the most important stats for your hero when leveling up.
Step By Step Guide
-
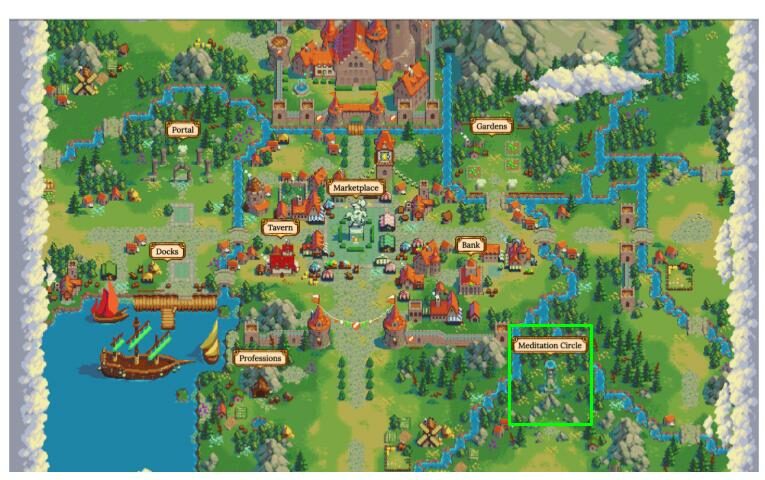
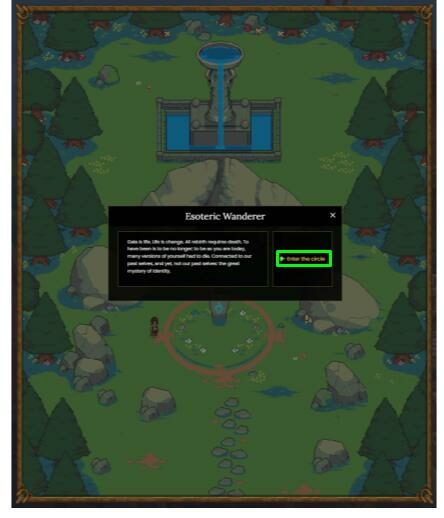
Meditation Circle
To upgrade your hero you must speak with the Esoteric Wanderer in the Meditation Circle. Be sure you have the required Rune Stones, JEWEL and XP or you will not be able to level up.
-
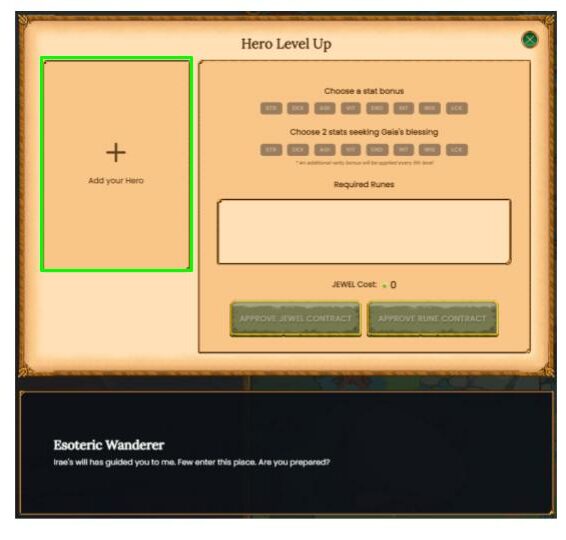
Select Hero
Choose the hero you would like to level up by clicking on the plus symbol. This will pull up your inventory of hero NFT’s.
-
Choose Stat Bonuses
Once you have selected your Hero you can select 3 different stats for the bonus & Gaia’s Blessing. The stat bonus guarantees a +1 increase to that given stat and the Gaia’s Blessing is a 50/50 chance for each stat selected. All three stats must be different.
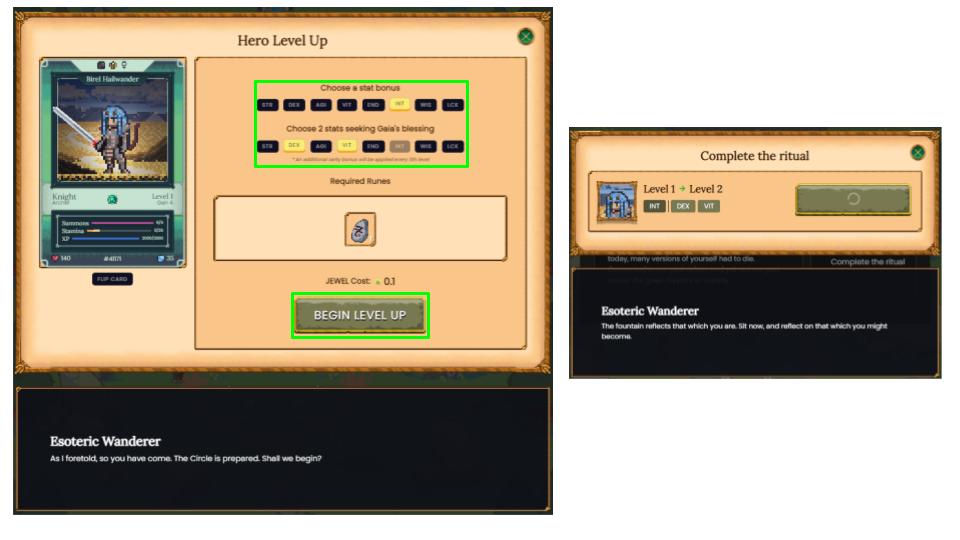
Once you have selected your preferred stats, click begin and approve the transaction in your web wallet.
-
Results
Once the transaction is successful, a chart showing the stat HP and MP increases will pop-up. You have now successfully upgraded your hero.
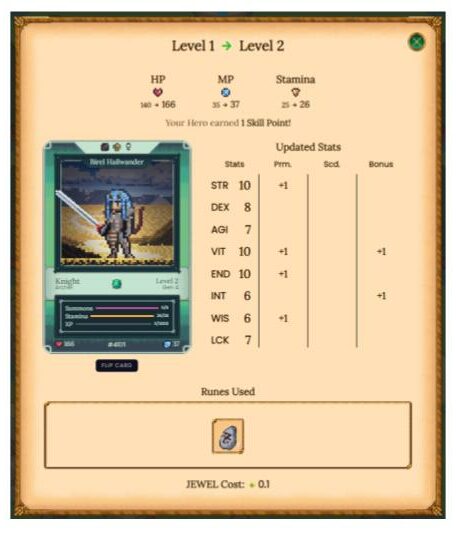
Gget out there and start questing so you can level up again!
Have you leveled up your DeFi Kingdoms hero yet? Let us know in the comments.
Hi I’m Mike, an active crypto investor DeFi enthusiast and crypto miner. I have been involved in crypto since March of 2021 and in DeFi since May 2021.
I’m also an avid outdoor adventurer!
December 27th 2021| Mike Humphrey
Hero Characteristics
Gender, Type & Location
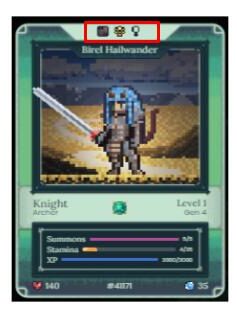
Gender type and location can be found at the very top center of the hero card. As the Defi Kingdoms game grows these characteristics are expected to become more important. Location, is likely to integrate with the land NFT’s and hero type may be involved with competitive PvP play. Scroll over the icons to find details out about each.
Type
- Dark
- Water
- Wind
- Fire
- Earth
- Air
Location
- Desert
- Swamp
- City
- Plains
Class
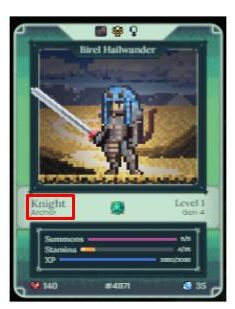
Class is one of the most important characteristics of a Defi Kingdom Hero. Each Hero has a class and a sub class, which determine:
- Base stats and stat increases when leveling up: Class determines what the base stats will be and how likely a given stat will increase when a hero goes up a level.
- Summoning: Classes are inherited (thought not directly) from the parent heroes. Class of the parent heroes is a major factor in determining what the class of a summoned hero will be.
- Health/Mana distribution: Health and Mana is determined based on class.
There are 8 basic classes, 4 advanced classes, 2 elite classes and 1 exalted class. All Generation 0 heroes are one of the 8 basic classes. Advanced, elite and exalted classes are created through summoning. Summoning a higher class hero is based on probability. Each increase in class level requires two parent heroes of the level below it. In general, 2 basic class parents might create an advanced class, 2 advanced parents might create and elite class, and 2 elite parents might create an exalted class.
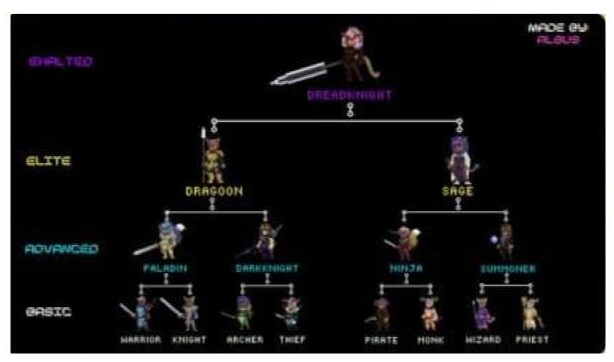
Basic Classes

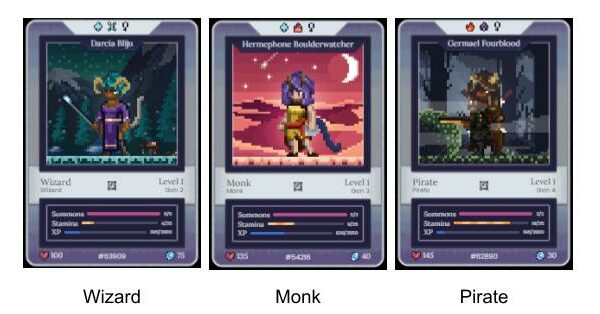
Advanced Classes (Base Stats +5)
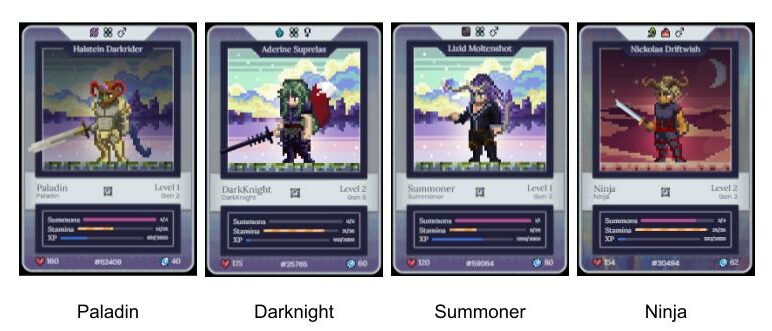
Elite Classes (Base Stats +10)
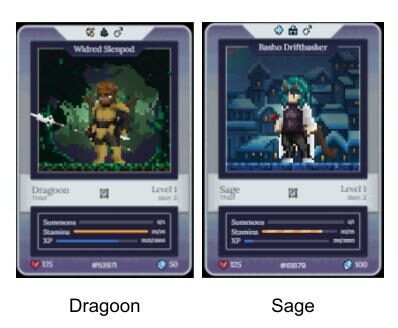
Exalted Class (Base Stats +15)
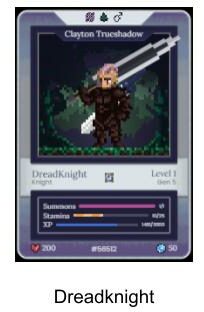
Your class and subclass determine how your hero will grow over time. A hero’s stats impact how well they perform quests.
Level, Experience and Generation
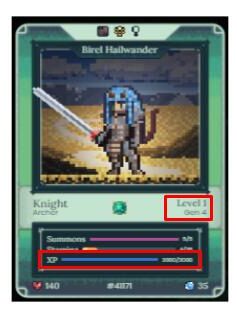
As your hero gains experience (shown in the experience bar) it will be able to level up and increase its stats. See Hero Stats for more details on how leveling up works.
A hero’s generation is determined when it is summoned. A new hero will be 1 generation greater than the highest generation of the two parent hero’s that summoned it. For example a Hero summoned by Gen 1 and Gen 2 parents will be a Gen 3 hero. The higher the generation, the more expensive it is to use that hero to summon new heroes. Lower generation heroes are more desirable.
Summons
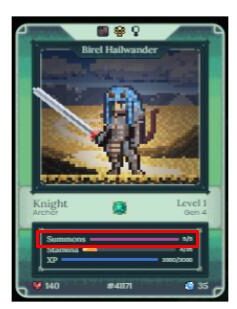
The summons bar, tells you how many times that hero can be used to create a new hero. Gen 0 heroes have an unlimited number of summons (making them very desirable). Every other generation is limited. The number of summons is determined by a heroes parents. A new hero will have 1 summon less than it’s parents (one less than the parent with the lowest summons remaining). Summons are not regenerated. Once the summons run out, there are no more available.
Health/Mana
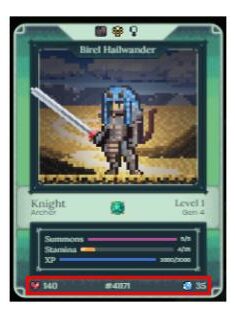
The Health and Mana of a basic hero will sum up to a total of 175. HP & Mana are split between the two based on class and sub class. Advanced, elite and exalted heroes have more Health/Mana.
Hero Stats
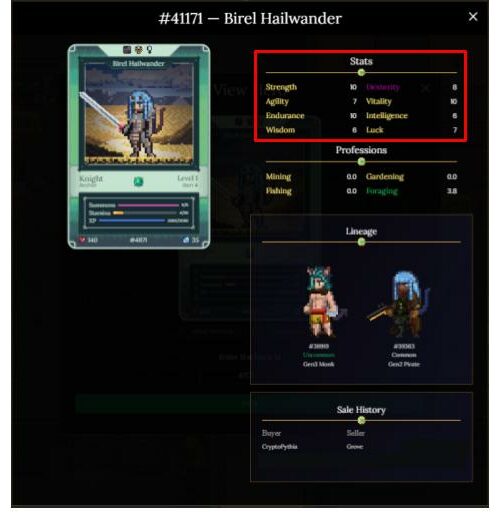
There are 8 basic hero stats that are determined when the hero is first summoned:
- Strength
- Agility
- Endurance
- Wisdom
- Dexterity
- Vitality
- Intelligence
- Luck
These base stats increase when a hero levels up. The primary and secondary classes determine the probability of a given stat of increasing. Below is a table showing the probability that Strength will increase during a level up for each of the different hero classes. Leveling up a stat is similar to rolling a die and tying to get a number less than the probability listed in the table. If successful the stat will increase.
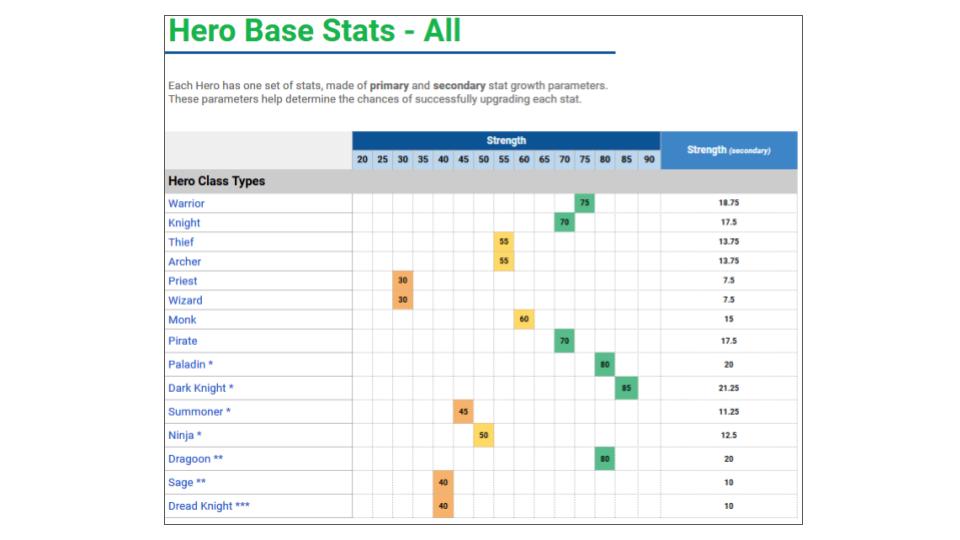
The DeFi Kingdoms development team has created a google sheet of all the Hero stats and probabilities. Advanced, elite and exalted heroes have greater base stats than the basic hero classes (See the Hero Classes)
Boosted stats:
A hero’s base stats and the chance of increases during leveling up can be boosted. A boosted stat will be green, purple or blue.
- Green: One time +2 to base stat.
- Blue: Added % chance of stat increasing when leveling up
- Purple: One time +2 to base state & increased chance stat growth when leveling up.
Professions
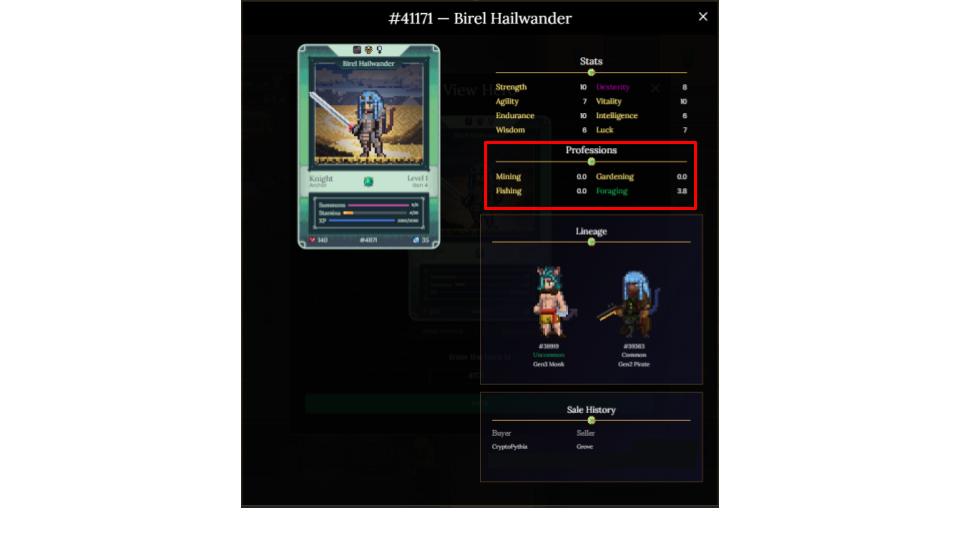
There are 4 different professions – mining, fishing, gardening, and foraging. A heroes profession is shown on the back of the card in green. When completing a profession quest, a hero that has the same profession as the quest will have a reduced stamina cost for the quest. Each profession is associated with specific character attributes as follows:
-
Mining
- Strength & Endurance
Heroes can be sent to the Jewel mine to unlock $Jewel or they can be sent to the gold mines. Only one hero can be sent at a time to the Jewel mine, but several heroes can be sent to mine $Gold. Heroes will burn stamina at a set rate per 10 minutes of mining. Heroes with Mining as their main skill will burn stamina at a lower rate. The list below shows the preferred hero classes based on their stat increases while leveling up (Strength/Endurance).
- Dark Knight (85/60)
- Paladin (80/80)
- Dragoon (80/70)
- Warrior (75/65)
- Knight (70/75)
- Pirate (70/55)
-
Fishing
- Agility & Luck
Fishing quests require a fixed amount of stamina per attempt. Heroes with Fishing as their main skill will require less stamina per attempt. Questing heroes may be rewarded with different fish that can be sold for $Gold or later used to create potions. The list below shows the preferred hero classes based on their stat increases while leveling up (Agility/Luck).
- Ninja (85/60)
- Thief (70/65)
- Sage (75/55)
- Dread Knight (60/60)
- Dragoon (65/50)
-
Gardening
- Wisdom & Vitality
Gardening quests are done within one’s own Garden and help speed up the growth of $Jewel producing plants. Increasing a Hero’s gardening skill can lead to more $Jewel rewards and greater chances of finding other resources. Only one hero can visit a garden at a time. Heroes will burn stamina at a set rate for every 10 minutes of Gardening. Heroes with Gardening as their main skill will burn less stamina. The list below shows the preferred hero classes based on their stat increases while leveling up (Wisdom/Vitality).
- Sage (90/60)
- Summoner (85/50)
- Paladin (65/80)
- Priest (80/50)
- Wizard (80/50)
-
Foraging
- Dexterity & Intelligence
Foraging allows your hero to pick out useful plants and other items. As a heroes foraging skill increases, the chances of finding valuable items increases. Foraging requires a fixed amount of stamina, and multiple heroes can undertake the quest at one time. Items can be sold in the market place or used to create potions. The list below shows the preferred hero classes based on their stat increases while leveling up (Dexterity/Intelligence).
- Dread Knight (75/65)
- Ninja (75/50)
- Dark Knight (55/70)
- Sage (40/90)
- Summoner (45/85)
- Archer (80/40)
Rarity
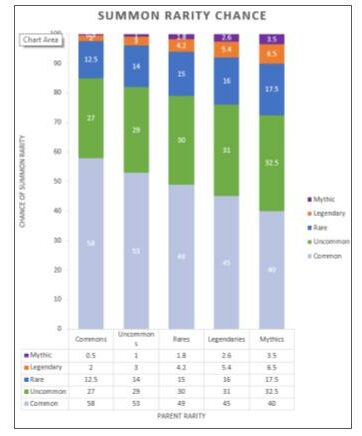
There are 5 levels of rarity from common to mythic. The rarity directly impacts the base stats of a hero. A common hero’s cumulative base stats will be 62. A heroes base stats increase by +2 for each increase in rarity.

Rarity may be inherited from parents when a new hero is summoned. The following graph shows the probability of producing progressively rarer offspring.
How to Choose A Hero
Choosing a hero is about finding the best hero for your goals within your price range.
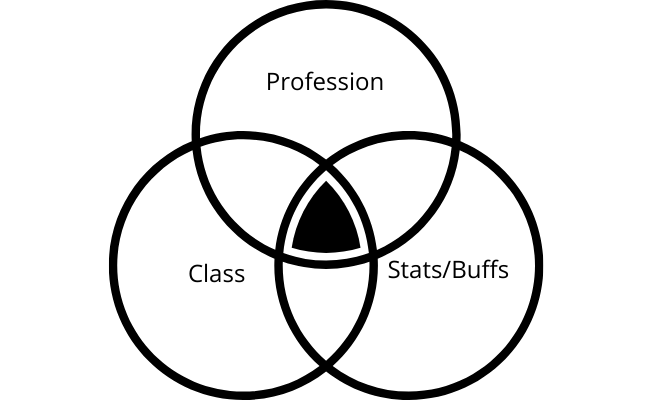
Profession, Stats & Class
When you purchase a hero consider the base stats, it’s class and it’s profession. The goal is to find a hero with a profession that matches it’s stats, and it’s class. Check the Heroes stat buffs to see if they align with its profession. You want to find the best balance between these 3.
Summons & Generation
If you intend to create heroes, the number of summons your hero has and it’s generation are major factors. The more summons your hero has available the more heroes you can create. This goes hand in hand with generation. The higher the generation, the greater the cost to summon new heroes. Gen 0 heroes have an infinite number of summons and a maximum summoning cost of 30 $Jewel. This is what makes them so valuable. A Gen 0 owner can rent out their hero indefinitely without the number of summons decreasing. Their offspring will also have the maximum possible summons for any pairing. Two Gen 0 parents will produce offspring with 10 summons.
What you should look for
- High number of summons
- Low Generation
Rarity
The rarer the hero the greater the value. If you have a choice between two heroes with the same class, stats and profession, the rarer hero is more valuable.
How to Buy a DeFi Kingdom Hero – Step By Step Guide
When choosing which hero to purchase many factors come into play. Are you looking for a hero to summon other heroes or are you looking for a hero to perform profession quests. As the game develops characteristics like type and location may also become more important. Budget must also be considered, how much $Jewel are you willing to spend to get your hero. Below we have a step by step guide to find the best hero for completing profession quests. You can easily find less expensive heroes by expanding your selection criteria to include a wider variety of sub classes and fewer stat buffs.
-
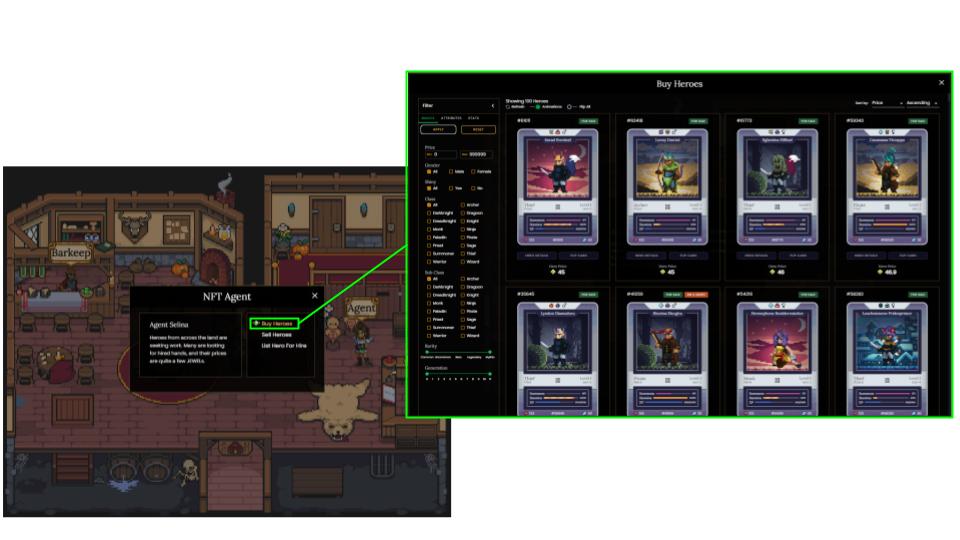
Speak to Agent in Tavern
Go to the tavern, speak with the agent and select Buy Hero.
-
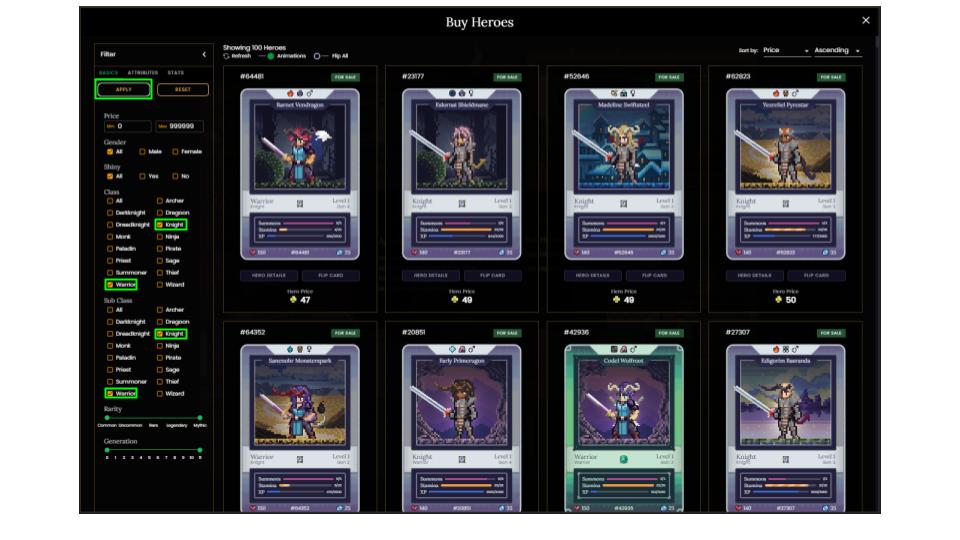
Filter By Class
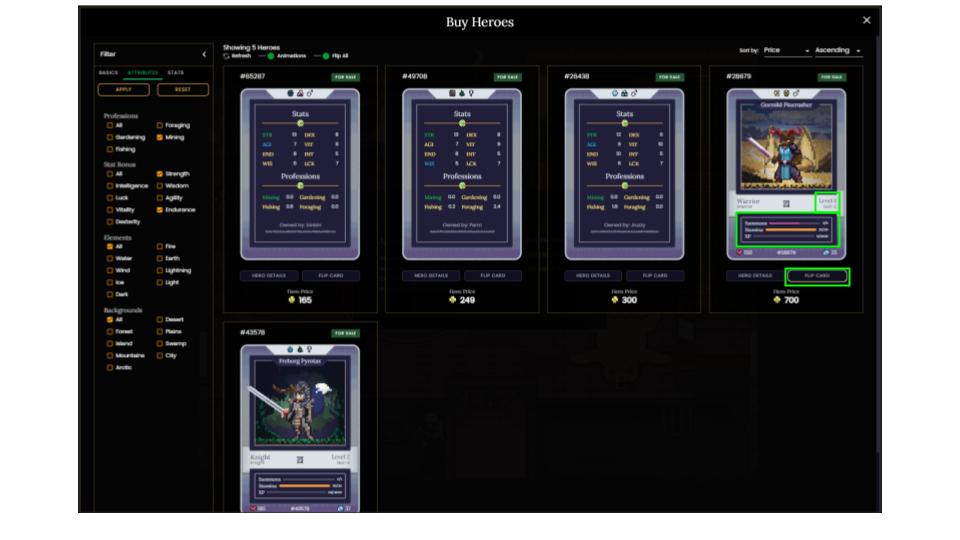
Use the profession list and recommended heroes above as a guide for selecting the preferred class for your hero. We will use the mining profession as an example and we will be looking for a basic class hero. Warriors and Knights are the best basic classes for mining. In the basics tab choose warrior and knight for both the primary and sub classes and apply the filter.
-
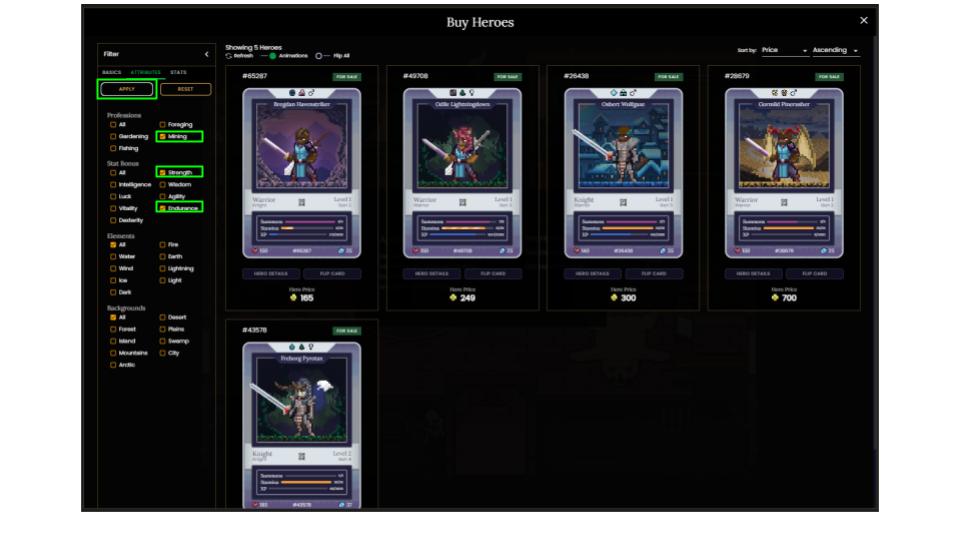
Filter By Profession and Buffs
Select the attributes tab and choose a profession and corresponding stat bonuses. In our case this will be Mining, Strength and Endurance. Apply the filter to see the results.
-
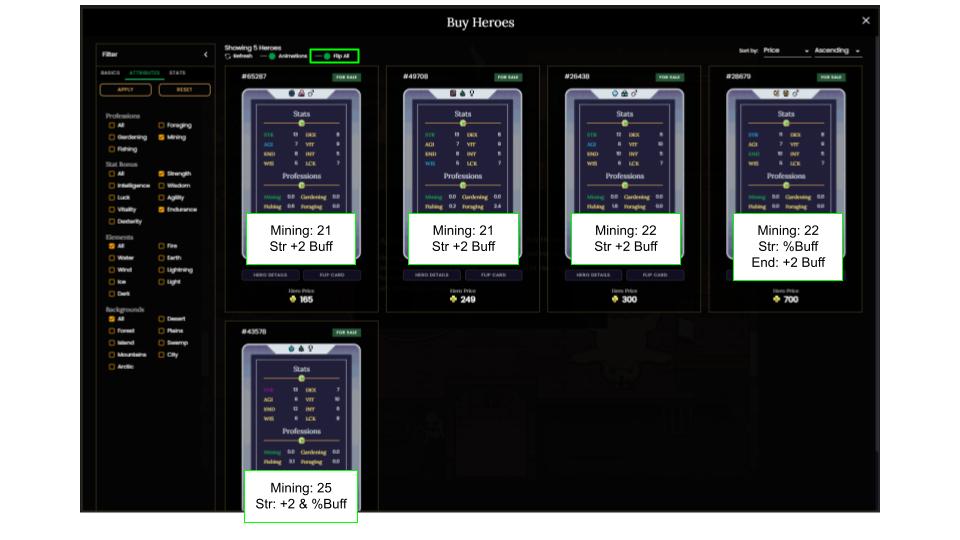
Flip and Compare Stats
Flip all the hero cards over to see a breakdown of their respective stats. Compare the total points for your selected profession (add the stats for the 2 skills required for your given profession together). Also compare the buffs for these stats. Green buffs are a one time increase whereas blue and purple improve stats when your hero levels up.
-
Compare Summons
Choose the best candidates and flip them over to compare the number of summons they have available and their generation. The higher the summons and the lower the generation the better.
-
Select and Buy Hero
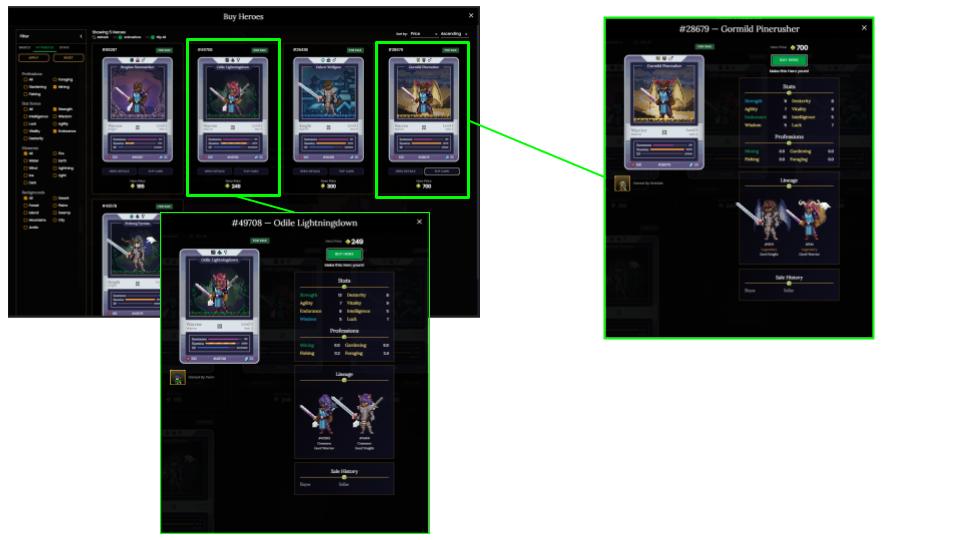
After filtering all of the heroes, comparing their stats and their buffs, there are 2 heroes we would consider. The highlighted hero on the left is a Gen 3 with 7/8 remaining summons. The hero on the right is a Gen 2 with 2/5 summons. The hero on the right has much better buffs, but also costs more than twice as much as the hero on the left. If you plan to summon more heroes, the hero on the left is a better choice. If your goal is to purchase the best mining hero than the hero on the right would be the better option.
Conclusion
Heroes in DeFi kingdoms have a ton of uses, many of which have not been fully released yet. As people continue to quest with their heroes and level them up valuing heroes will become more and more challenging. We hope this guide has helped you to better understand the characteristics of heroes, what makes them valuable. Good luck, and we hope to see you in Serendale!
Do you own a DFK Hero? Let us know in the comments
Hi I’m Mike, an active crypto investor DeFi enthusiast and crypto miner. I have been involved in crypto since March of 2021 and in DeFi since May 2021.
I’m also an avid outdoor adventurer!
December 1st 2021| Mike Humphrey
What is Defi Kingdom
DeFi Kingdom combines gamified yield farming, with classic console game graphics. Jewel, the in-game token is earned by providing liquidity to pools as well as staking. Where it differs from a normal swap protocol, is the in game NFTs (heroes and land), whose attributes help you to earn more yield. NFT heroes, and land are used to undertake quests and even PvP games to level up, increase their stats, and increase your rewards.
Transfer Funds to Harmony
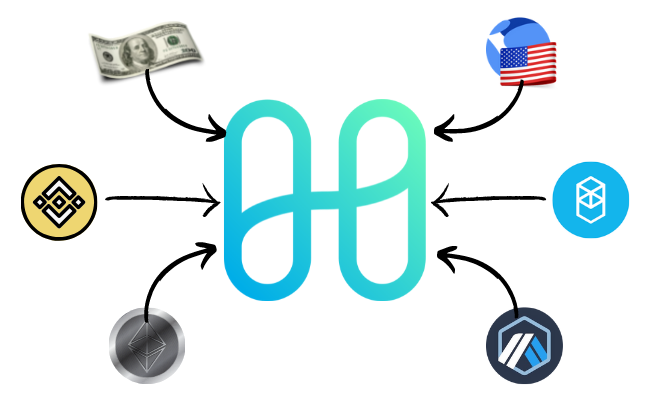
In order to play Defi Kingdom you will need to have assets on Harmony. To transfer funds over to Harmony you can use the Harmony Bridge, Terra Bridge, Synapse Cross Chain Bridge, or Anyswap. You will also require a small amount of ONE token (the gas token for Harmony). Read our guide on how to Transfer funds to Harmony. Harmony is compatible with Metamask. Read how to Add Harmony to Metamask.
Create Your Profile
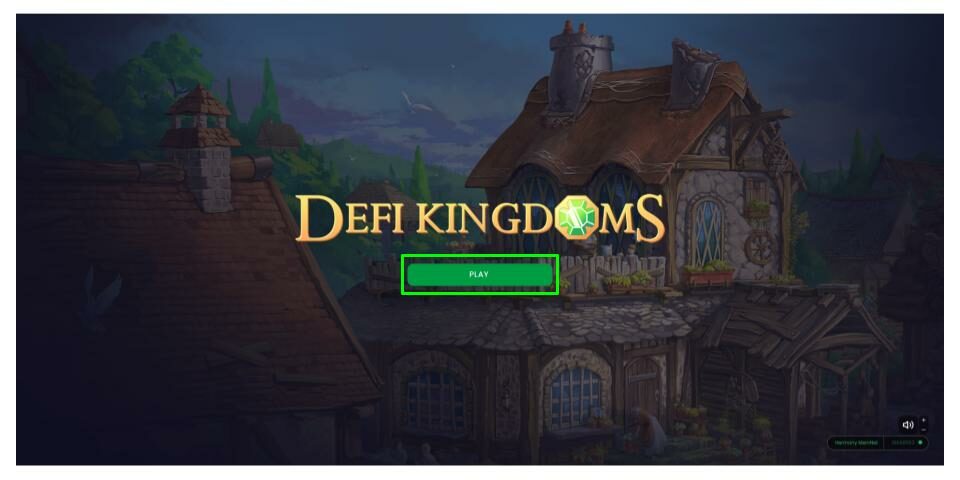
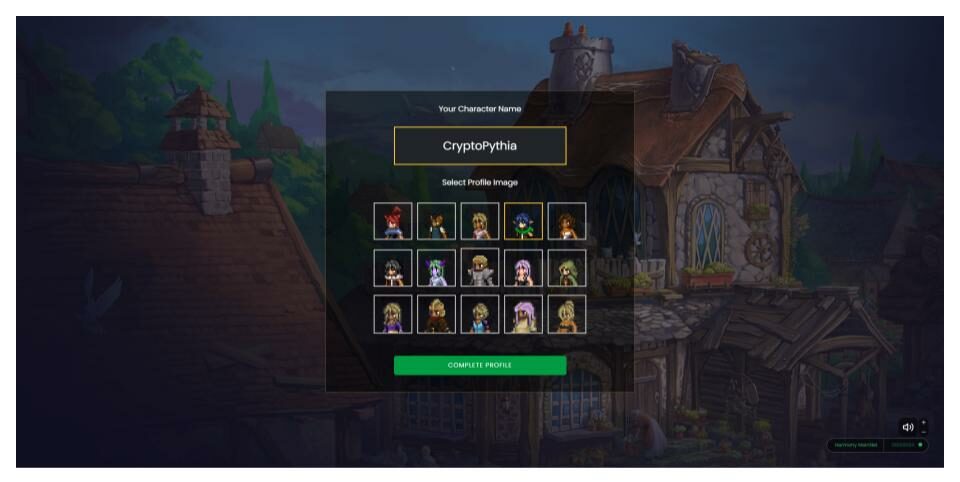
The first time you log into DeFi Kingdoms, you will be asked to create a username and select and avatar. Click on the play button and give permission for the site to connect with your wallet.
A new window will open where you will enter your username and select your character avatar.
Navigating The Kingdom
Once you have created your character, you are ready to start exploring the world of DeFi Kingdom.
-
-
World Map
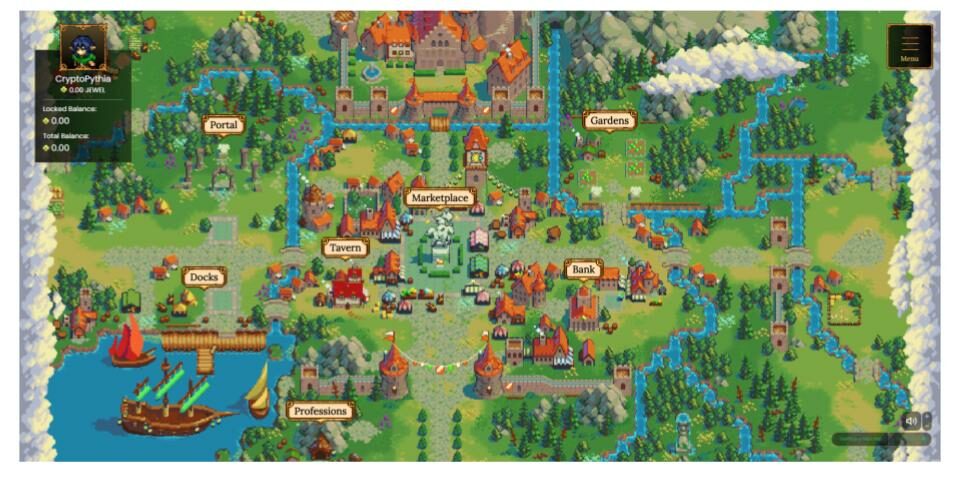
The world map is the starting point for your journey through the kingdom. Each area is identified on the world map with a sign. To navigate from one area to another you can click on the signs, or use the menu in the top right.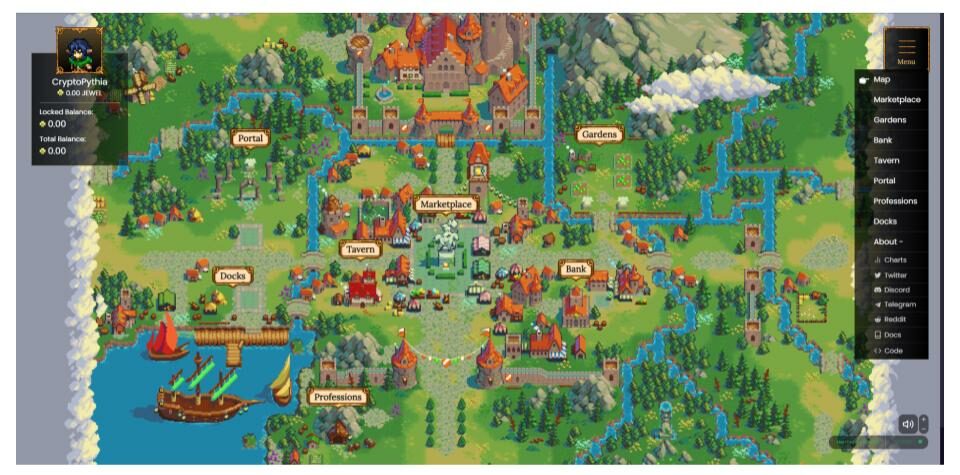
The menu allows you to quickly move from one are to another without having to go back to the world map. From the menu you can also access external links to statics, docs and various contact channels. As the game grows, the world map will continue to expand and new areas will open up. Now that we have an idea of how to get around in the game lets explore what you can do in each of the areas.
-
Market Place
The Market Place is the center of DeFi Kingdom. Here you can exchange tokens, deposit them in liquidity pools, and catch up on the “local” news.
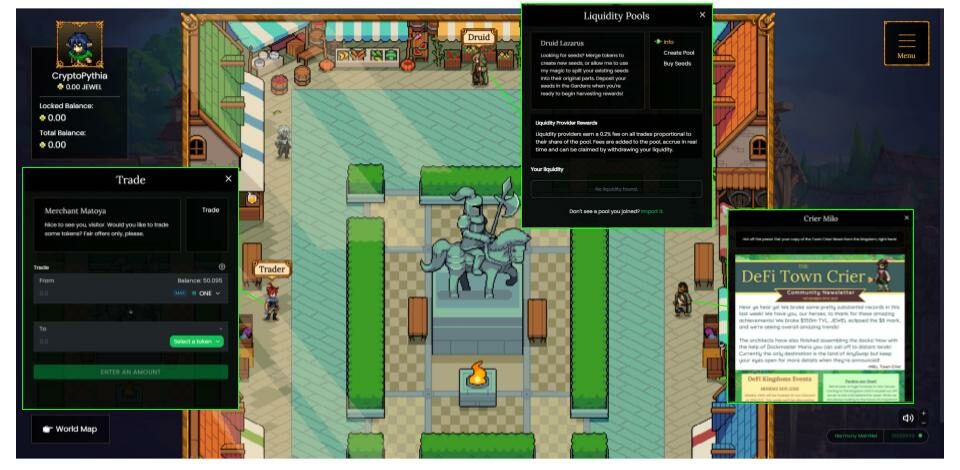
There are three NPC’s in the Market Place:
- Trader: Allows you to swap tokens
- Druid: Pool creation or Deposit your tokens into a pool
- Town Crier: Information and updates about DeFi Kingdom
-
Gardens
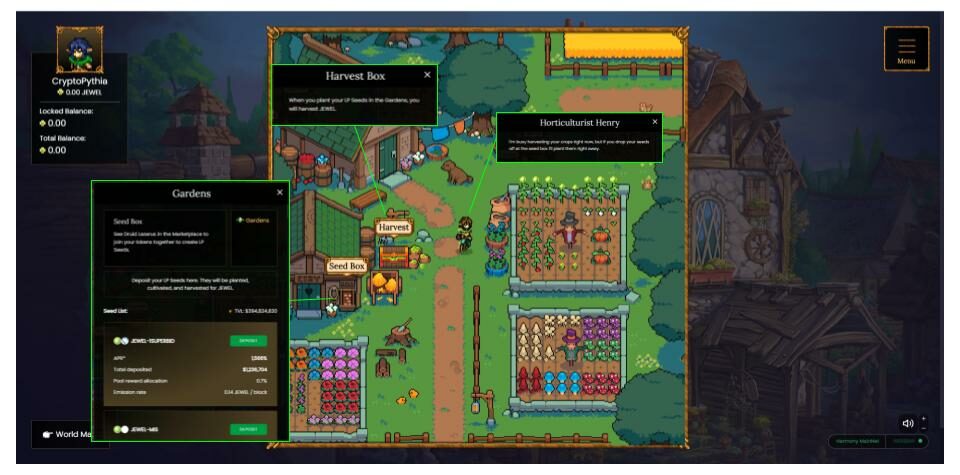
The Gardens are where players can farm liquidity pool (LP) tokens for Jewel. To deposit your LP tokens (called seed in the game) you must put them in the Seed Box. Jewel rewards are collected from the Harvest Box.
-
Bank
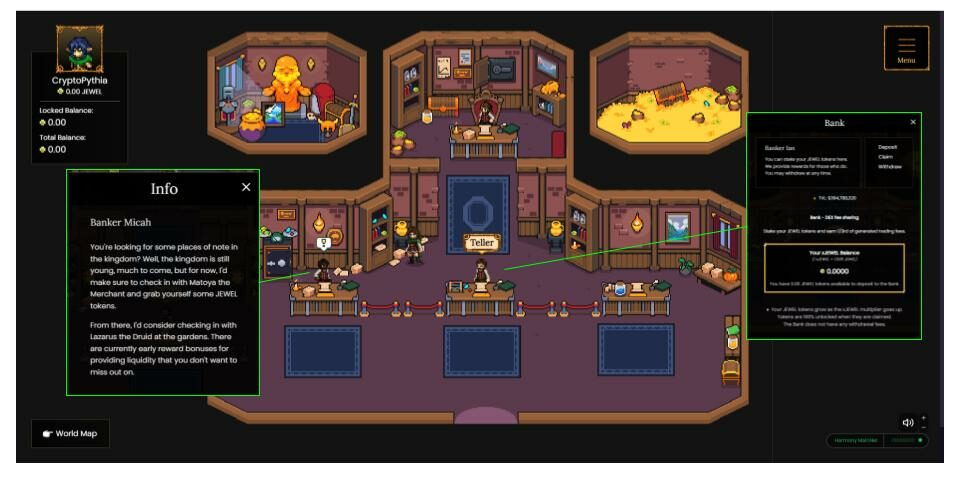
At the Bank players can stake their Jewel in the protocol and receive a portion of the platform trading fees. When Jewel is deposited, you will receive xJewel in your wallet. As fees accumulate in the protocol, xJewel increases in value. When you withdraw xJewel, you receive the Jewel you deposited plus the accumulated fees.
-
Tavern
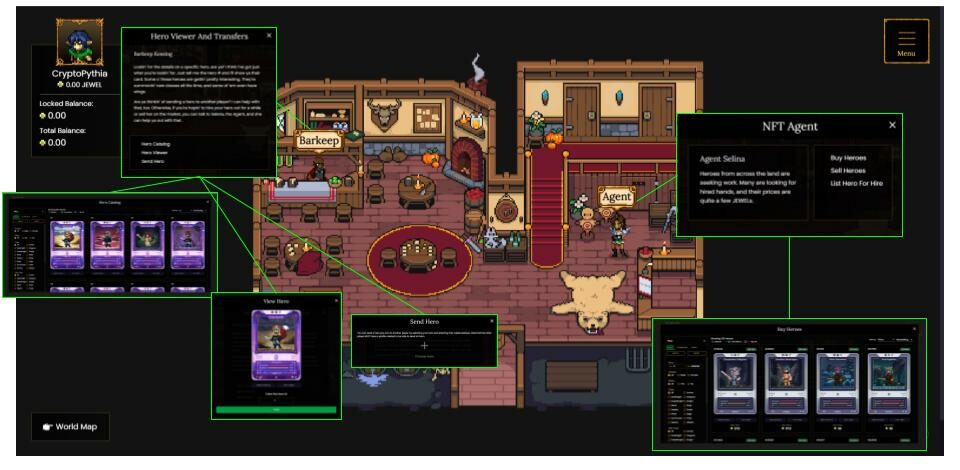
The Tavern is the gathering place of heroes (in-game NFT’s). In the tavern you can purchase, rent, and research DeFi Kingdom heroes. The Barkeep has an inventory of searchable heroes, and also allows you to send heroes to other users. The NFT agent is the marketplace for purchasing, selling, and renting heroes.
-
Portal
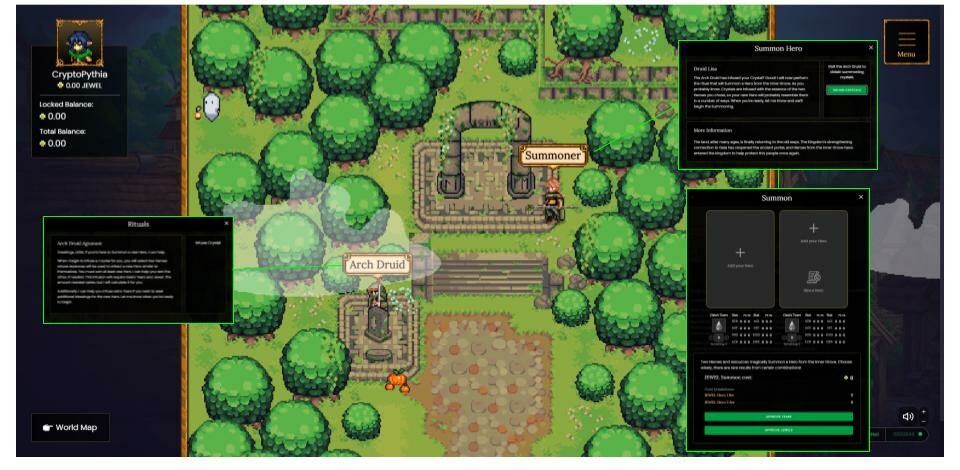
The Portal is used to summon/create new heroes/NFTs. Using Jewel, Tears and 2 heros, you can create new NFT.
-
Professions
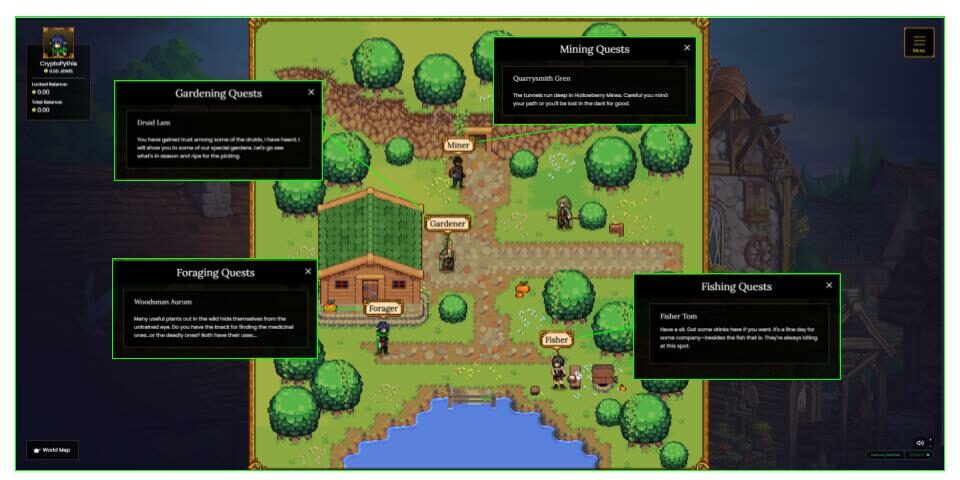
Professions, is where your hero goes to perform quests and activities. In exchange for taking on the quests you will receive Jewel. There are four professions available – fishing, gardening, foraging and mining. Quests are scheduled to go live in Q4 of 2021.
-
Docks
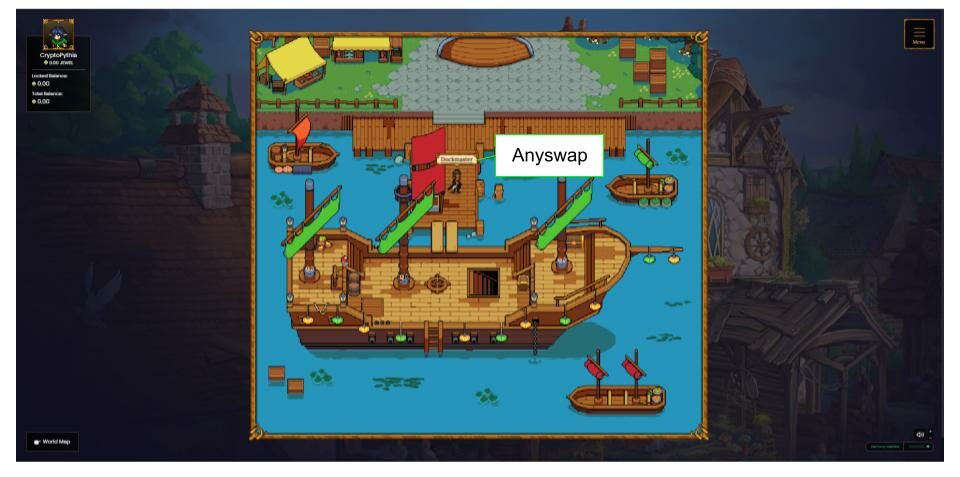
The docks is where you can leave DeFi Kingdom and go to another blockchain. Clicking on the Dockmaster will take you to Anyswap where you can exchange your Harmony tokens for tokens on another blockchain.
-
Wishing Well Quest
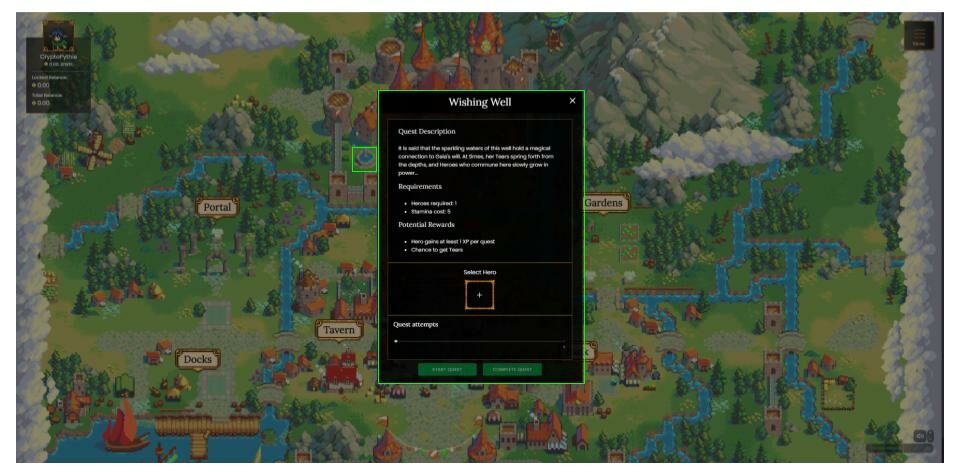
The Wishing Well is a quest, that allows you to collect tears (required to summon new heroes). You must have a hero NFT in order to complete the quest.
-
How to Play DeFi Kingdoms
The following is a quick guide on how to get started with DeFi kingdom. Before starting be sure you already have funds transferred to Harmony, and ONE token in your wallet. At it’s heart DeFi Kingdoms is a swap protocol, similar to Sushi Swap or Viper Swap. To earn Jewel rewards, you must deposit liquidity in a pool and then stake your liquidity pool tokens. Jewel can then be used to purchase in game items.
-
-
-
Choose a Pool
You first stop in Defi Kingdom should be to check which pool you want to provide liquidity to. To do this head to the Gardens and click on the Seed Box. A window will open showing you all of the liquidity pools available and their APR. Choose a pool that you feel has the best returns with the lowest chance of impermanent loss. Impermanent loss occurs when the relative price two tokens in a pool fluctuates disproportionately. Before investing your tokens, be sure to do your own research and understand the risks involved.
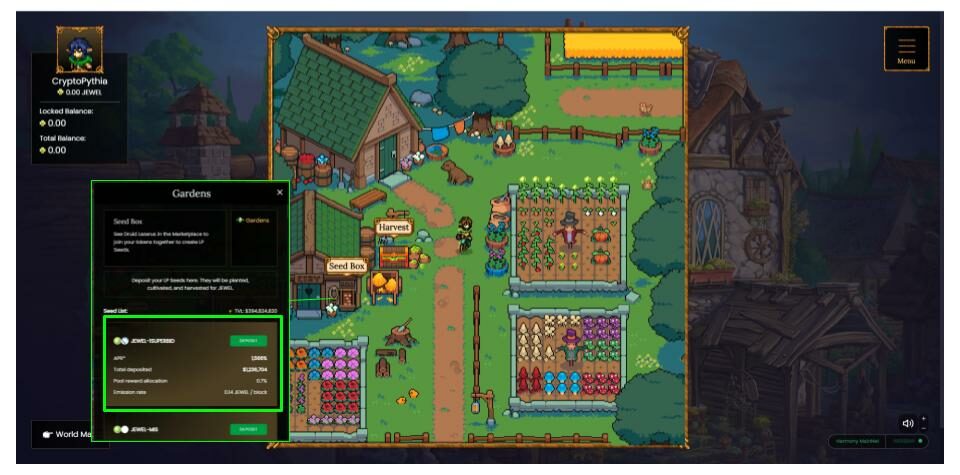
-
Exchange Your Tokens
Now that a pool has been selected, head to the Market Place to exchange tokens and add them to the liquidity pool. In the Market place, speak with the trader and exchange your tokens so that you the two pool tokens in a ratio of 1:1.
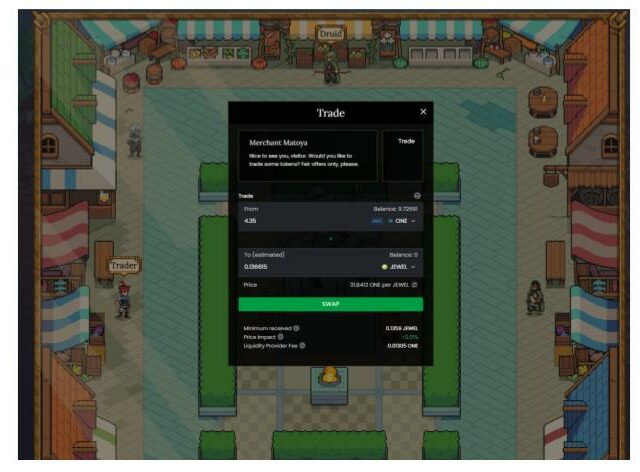
In the Example above, I have swapped half of my ONE tokens for Jewel (leaving some ONE in my wallet for gas fees). This will allow me to put in equal amounts of ONE token and Jewel token into the liquidity pool in the next step. Click swap, approve the tokens and then approve the transaction. (see our guide on keeping Metmask safe)
Once you have exchanged your tokens, speak to the Druid and deposit the tokens into a liquidity pool. You will need to deposit tokens in a 1:1 ratio, where the value of each token deposited is equal (for example 4.35 ONE: 0.138815 Jewel as seen in the swap above). Once deposited you will receive LP tokens for the pool. This represents the portion of the pool you own.
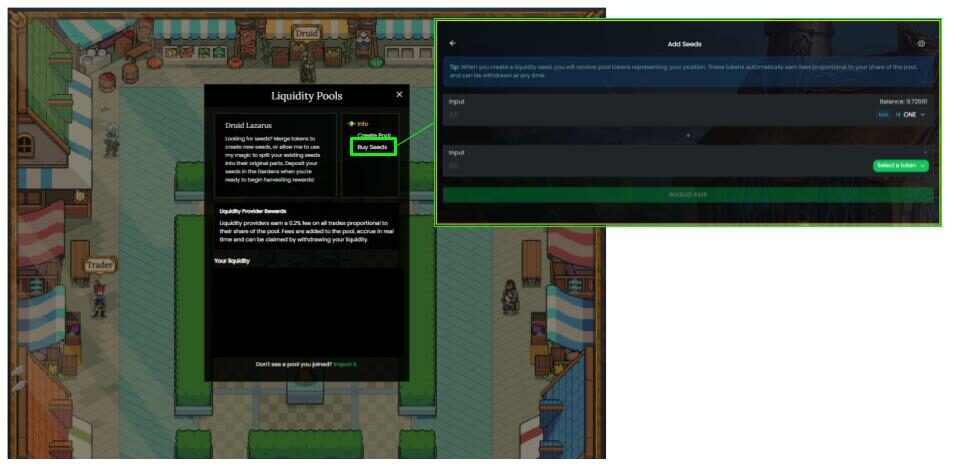
-
Stake LP Tokens
Read about the DeFi Kingdom tokenomics below before depositing your LP tokens. There are restrictions for withdrawing staked LP as well as locked rewards with vesting schedules. To stake your tokens and earn additional Jewel rewards, head back to the Gardens. Click on the Seed Box and select the liquidity pool with your given token pair and choose deposit.
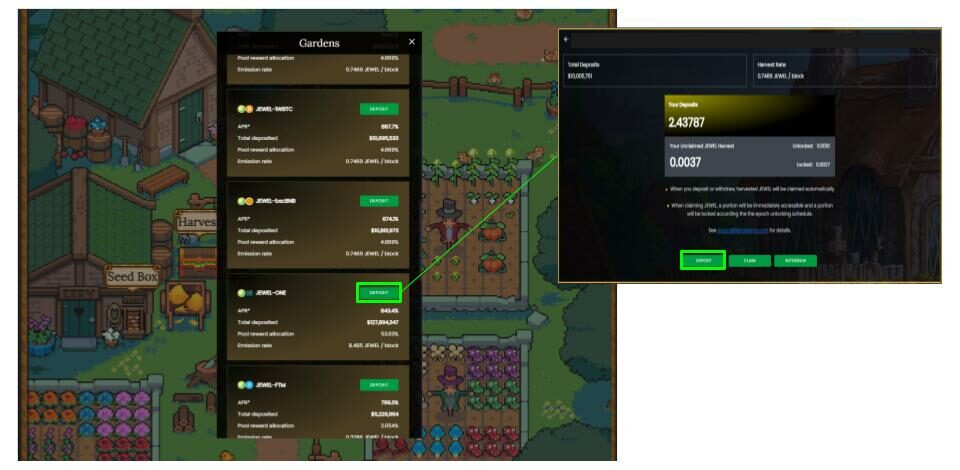
DeFi Kingdom Tokenomics
DeFi Kingdoms has developed several strategies to reduce the volatility of the Jewel token and to protect the longevity of the ecosystem.
LP Staking Withdrawals
To prevent flash loans and pump and dump strategies, DeFi Kingdoms has implemented a withdrawal fee schedule. If you withdraw your LP within the same block it was deposited, there is a 25% fee on the withdrawal. The fee decreases progressively down to 0.01% at roughly 1 month. See the table below for the complete fee schedule.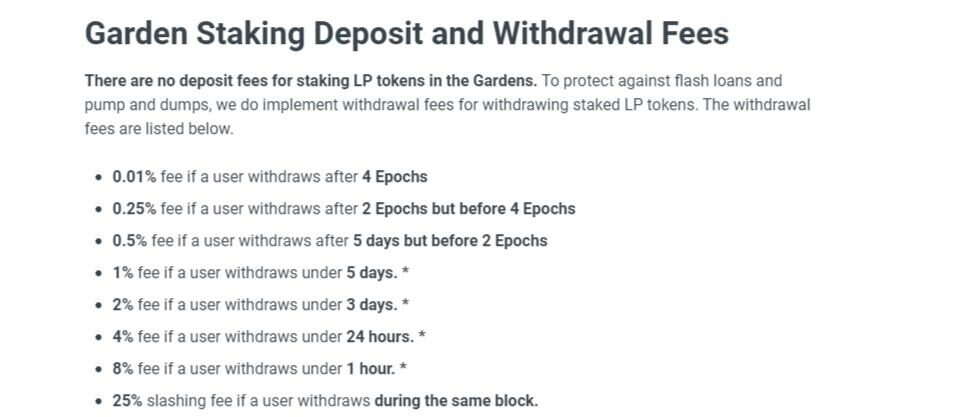
Locked Jewel & Vesting Schedule
Staking rewards have two components – locked, and unlocked Jewel. Locked Jewel begins vesting in January of 2022. The percentage of your rewarded Jewel that is locked decreases over time. For example at Epoch 1, 95% of the rewarded Jewel was locked. At Epoch 2, 93% of the rewarded Jewel was locked. The percentage of locked Jewel decreases by 2% every Epoch (approximately 1 week). This strategy prevents the supply of Jewel from spiking in the market and helps to maintain the token’s value.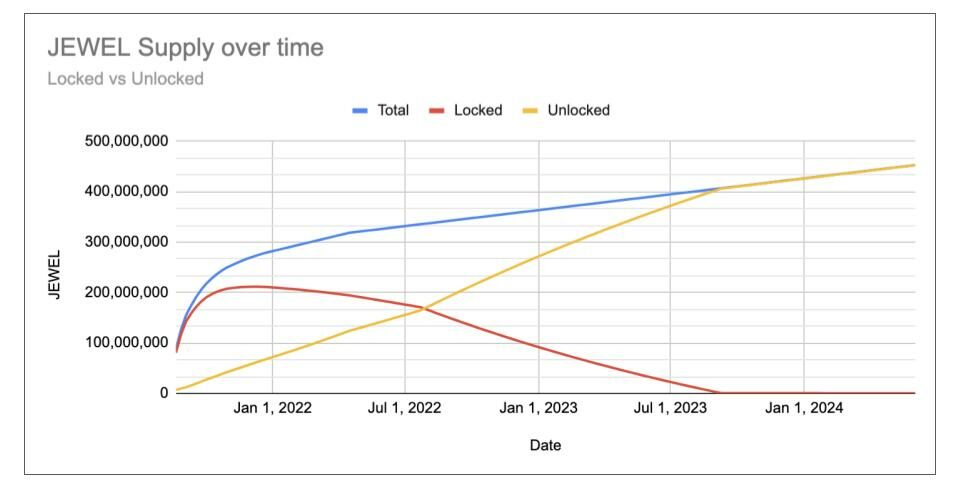
-
Harvesting Rewards
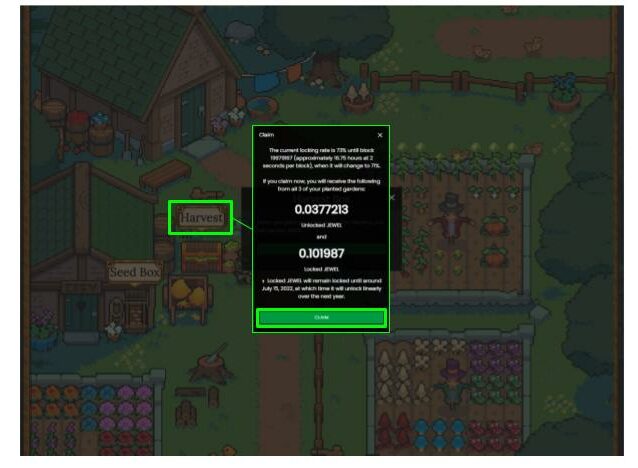
As Jewel rewards start to accumulate you can withdraw the unlocked Jewel from the Garden Harvest Box. Click on the Harvest Box and click claim. Claimed Jewel can either be re-invested into one of the liquidity pools, deposited in the bank to receive xJewel, or can be used to purchase in game items.
-
Stake Jewel in the Bank
To earn additional rewards as you accumulate Jewel, you can deposit it in the Bank. Players who deposit Jewel into the bank receive a distribution of 1/3 of all trading fees on the platform. When you deposit Jewel, you receive xJewel in your wallet, which increases in value based on the platform trading fees. To deposit your Jewel, speak to the Teller at the bank and select deposit. Select the amount of Jewel you wish to put in and approve the transaction. xJewel will now appear in your wallet.
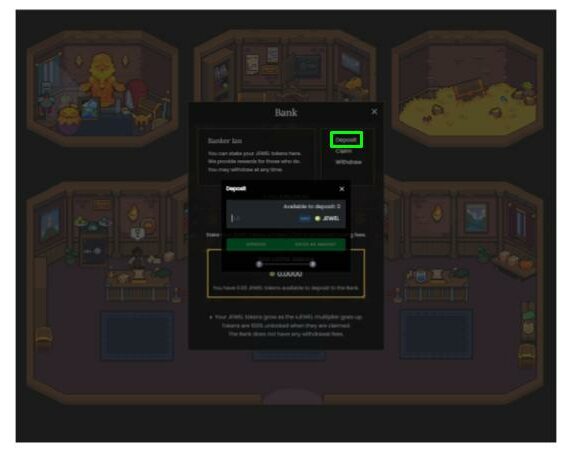
When you are ready to use your Jewel, you can head back to the bank, speak to the teller, and select withdraw. -
Purchase Your First Hero
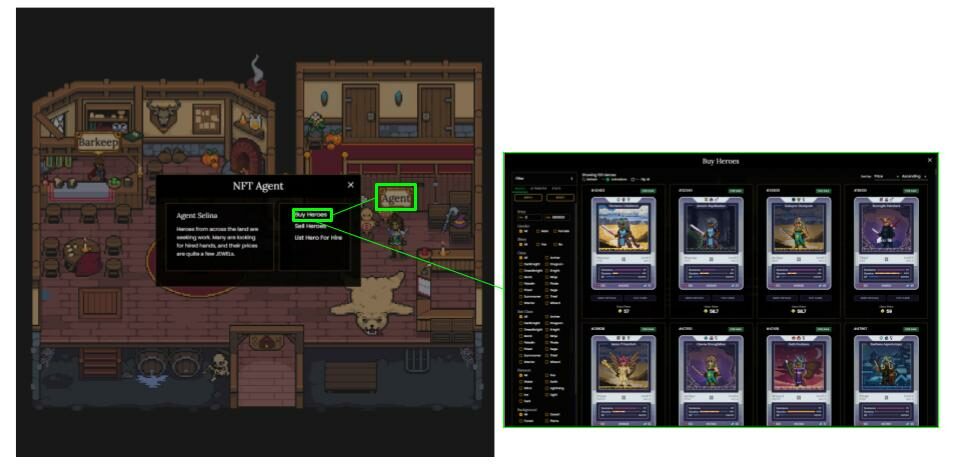
When you have enough Jewel, you can purchase your first hero from the Tavern. Speak with the agent to see a list of all the heroes currently available. Select The Hero you wish to purchase, approve the Jewel and the transaction.
-
Summoning A New Hero
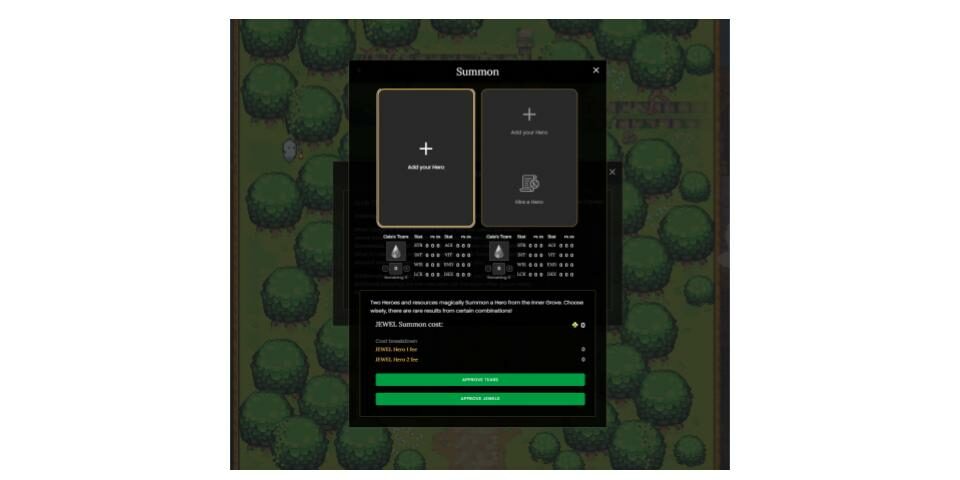
To summon a hero, you will need 2 heroes, some Jewel, and Tears. Go to the portal and speak with the Arch Druid, and create a Summoning Crystal. Select the two heroes and approve the required Jewel and Tears. Once you have infused a Summoning Crystal speak with the Summoner and a new hero can be created.
-
-
What’s Coming
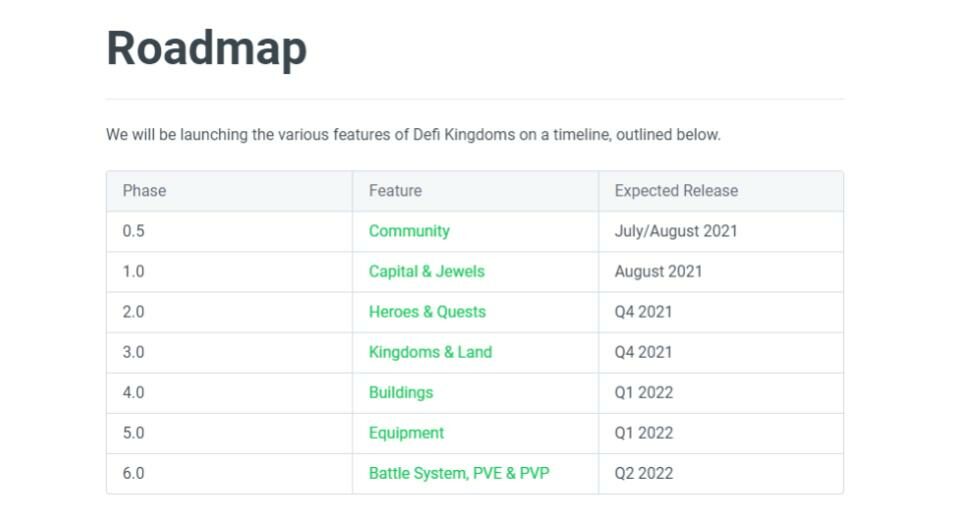
DeFi Kingdoms is still quite new and there are some exciting advancements on the way. So what is next for the game? DeFi Kingdoms is set to expand the NFT’s available with land to be introduced. Quests are under development and they will allow heroes to begin leveling up, which will increase player rewards. There is also PvP and PvE game play scheduled for release in 2022. Below is the roadmap from the developers.
Have you played DeFi Kingdoms yet? Let us know in the comments
Hi I’m Mike, an active crypto investor DeFi enthusiast and crypto miner. I have been involved in crypto since March of 2021 and in DeFi since May 2021.
I’m also an avid outdoor adventurer!
November 29th 2021| Mike Humphrey
What is Harmony (ONE)
Harmony (ONE) is an Ethereum layer 2 solution that is fully EVM compatible. Started on the Binance Launchpad, it went live in May of 2019 as a decentralized blockchain platform. It’s goal is to bridge scalability and decentralization for fungible and non-fungible tokens. It combines low gas fees (paid in ONE token) and fast transaction speeds. Harmony (ONE) is home to the crypto gaming platform DeFi Kingdom.
Harmony Wallets
Any Ethereum compatible wallet will work on the Harmony (ONE) network. We recommend Metamask due to its popularity and ease of use. Below is a list of wallets that will work on Harmony. For more info and other wallet options read our article about cryptocurrency wallets.
How to Transfer Funds to Harmony
In order to start using Harmony you will need to transfer funds to the Harmony network. You can do this in one of two ways – purchasing on an exchange or transferring from another network through a bridge. If you already have funds on Mainnet or on another layer 2 solution proceed to Option 2.
-
Buy ONE Token on an Exchange
In order to send funds from an exchange to Harmony you will first have to purchase the ONE token. If you have a Crypto.com account, you can do this directly without fees. See the guide below for purchasing and transferring ONE from Crypto.com to Harmony. Prior to doing this, you must set up your wallet on the Harmony Network (Harmony to Metamaks Guide).
Crypto.com
-
Purchase One
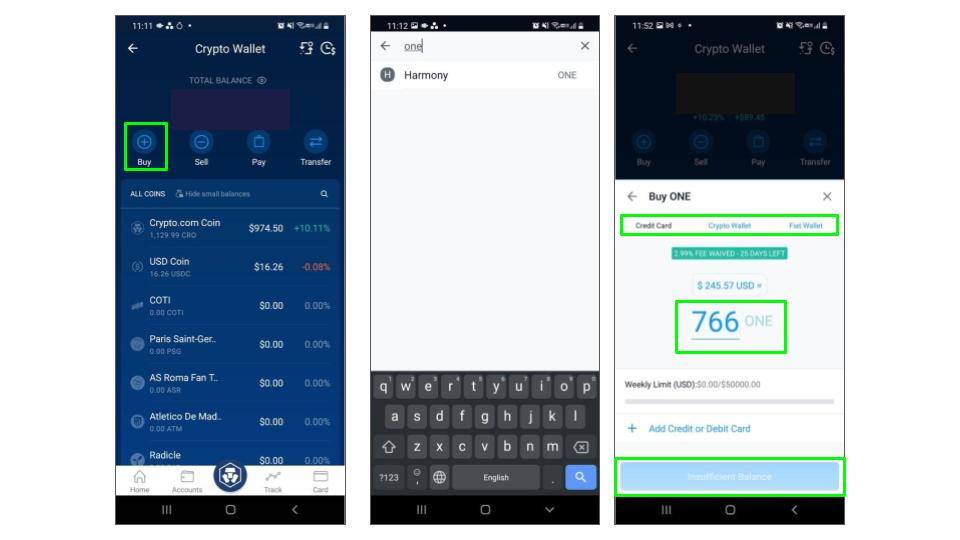
To purchase ONE sign into your Crypto.com app, and select buy. Search for the ONE token. Once selected, choose your payment method, the amount you want to purchase and click purchase.
-
Transfer One to Harmony Wallet
Once the transaction has been approved and gone through on Crypto.com, you can then transfer directly to your wallet. To do this, open the app, and choose transfer. Select withdraw, and choose an external wallet as the destination.
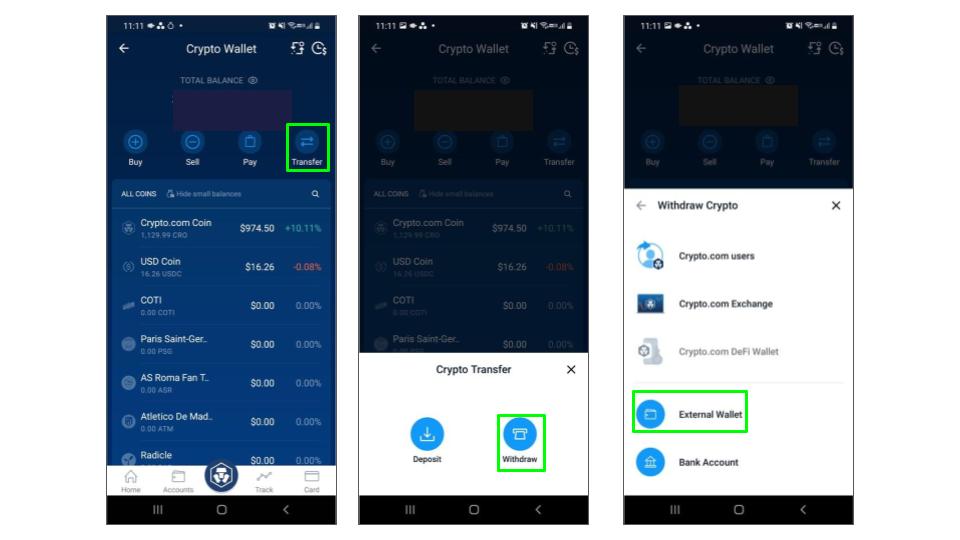
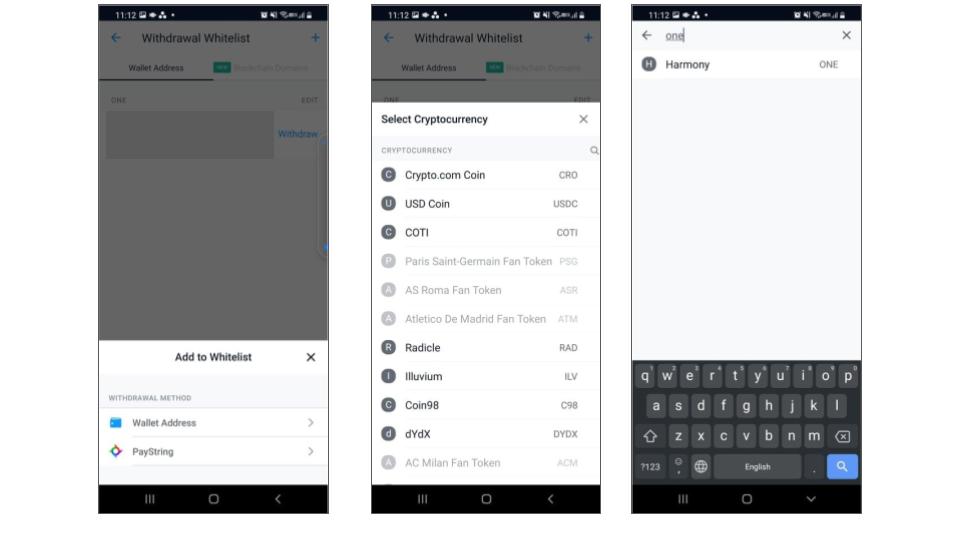
Add your wallet to the white list by clicking the + symbol in the top right and choosing wallet address. Select the ONE token.
In the new pop-up, choose ERC20 as the network, and enter your wallet address. You can use the QR code and camera on your phone to prevent entry errors. Add a wallet name so you can distinguish the wallet after. Click continue and follow the required steps. If you have 2FA activated, you will need to enter in your security code to complete the transfer.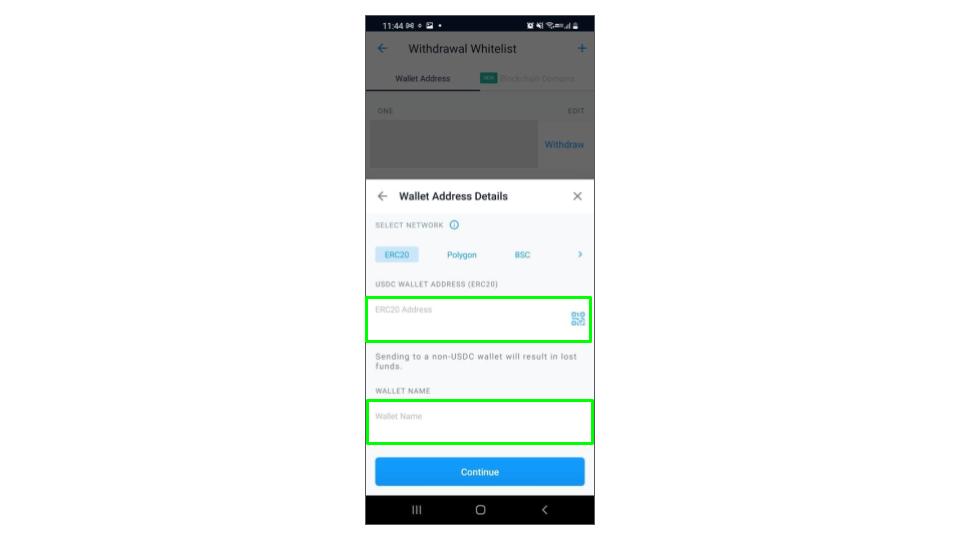
Crypto.com will confirm the transfer and your funds will appear in your Harmony wallet. If you are using Metamask, you may need to add the ONE coin before you will be able to see it in your wallet. (Harmony to Metamask)
-
-
Bridge Funds to Harmony
If you already have funds, or ERC20 tokens on a different chain that you would like to transfer to Harmony, you can bridge these assets over. Be sure to check the list of Harmony’s ERC20 (HRC20) tokens before transferring. Depending on the location of your assets, there are different bridging protocols available.
-
-
Harmony Bridge (Mainnet & Binance)
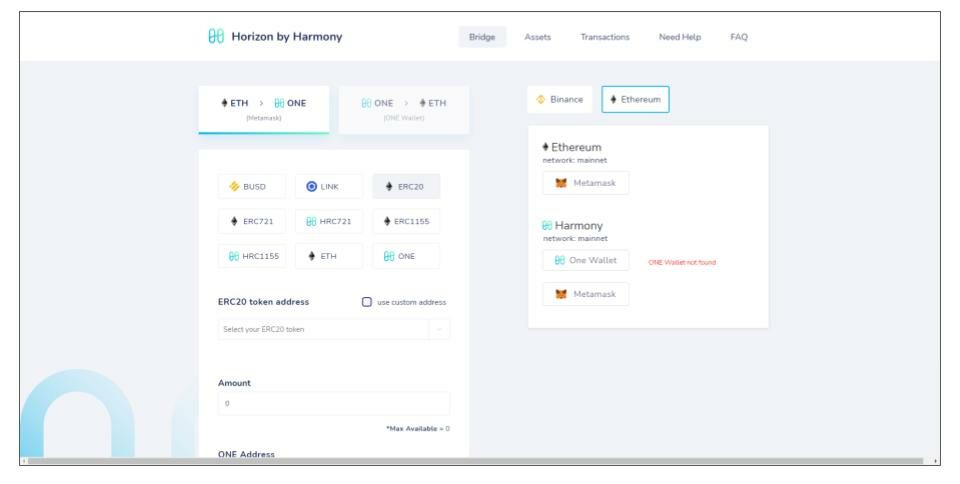
The Harmony Bridge can transfer ERC20 tokens from either the Binance Smart Chain or Etherum Mainnet. Be aware if you are transferring from Ethereum Mainnet, the fees may be quite high. If you are transferring from a layer 2 (Polygon, Fantom, Arbitrum, Avalanche, etc) use one of the other options below that allow you to transfer directly without having to go through the Mainnet.
-
Synapse (Multi-Chain)
Synapse is a cross chain swap protocol that allows you to transfer directly from one layer 2 solution to another. Synapse also offers several cross chain pools as well as their own nUSD & nEth wrapped tokens. Use synapse if you have funds currently sitting on an L2 chain that you wish to transfer to Harmony.

-
Anyswap (Multi-Chain)
Like synapse, Anyswap is a cross chain swapping protocol that allows you to bridge assets from one layer 2 solution to another, without the fees of going through the Ethereum Mainnet.

-
Terra Bridge (Terra)
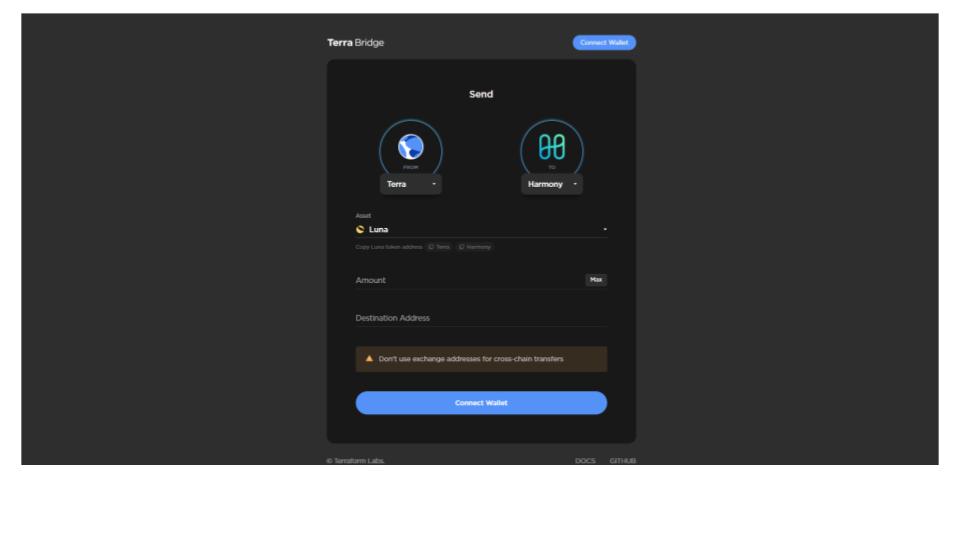
For users of the Terra ecosystem, the Terra bridge allows you to send assets from Layer 1 to Terra, as well as from Terra to Harmony or Binance. If you have assets on the Terra ecosystem that you want to transfer to Harmony, the Terra bridge with its low fees is the best option.
-
-
Where to Buy One Token
Once you have funds on the Harmony chain, you will need to have One token in your wallet in order to pay gas fees. When you first bridge funds to Harmony you should receive an airdrop of ONE that can be used for your first transactions. In order to get more you will need to use a swap protocol. The following are two swap protocols active on Harmony.
Have you transferred funds to Harmony? Whats your favorite layer 2 solution? Let us know in the comments
Hi I’m Mike, an active crypto investor DeFi enthusiast and crypto miner. I have been involved in crypto since March of 2021 and in DeFi since May 2021.
I’m also an avid outdoor adventurer!

